The Crypt Lake Trail’s true danger isn’t the famous ladder or tunnel; it’s a combination of hidden factors like rock quality and time pressure that can trap even fit hikers.
- Polished, slippery rock requires specific footwear (approach shoes), not just any hiking boot.
- Afternoon thunderstorms in the Rockies are a predictable threat, made worse by the ferry schedule’s time pressure.
- Your sea-level fitness is no protection against altitude sickness; proper pacing is everything.
Recommendation: Assess your readiness by understanding this “risk system” and your personal limits, not just by looking at photos of the exposed sections.
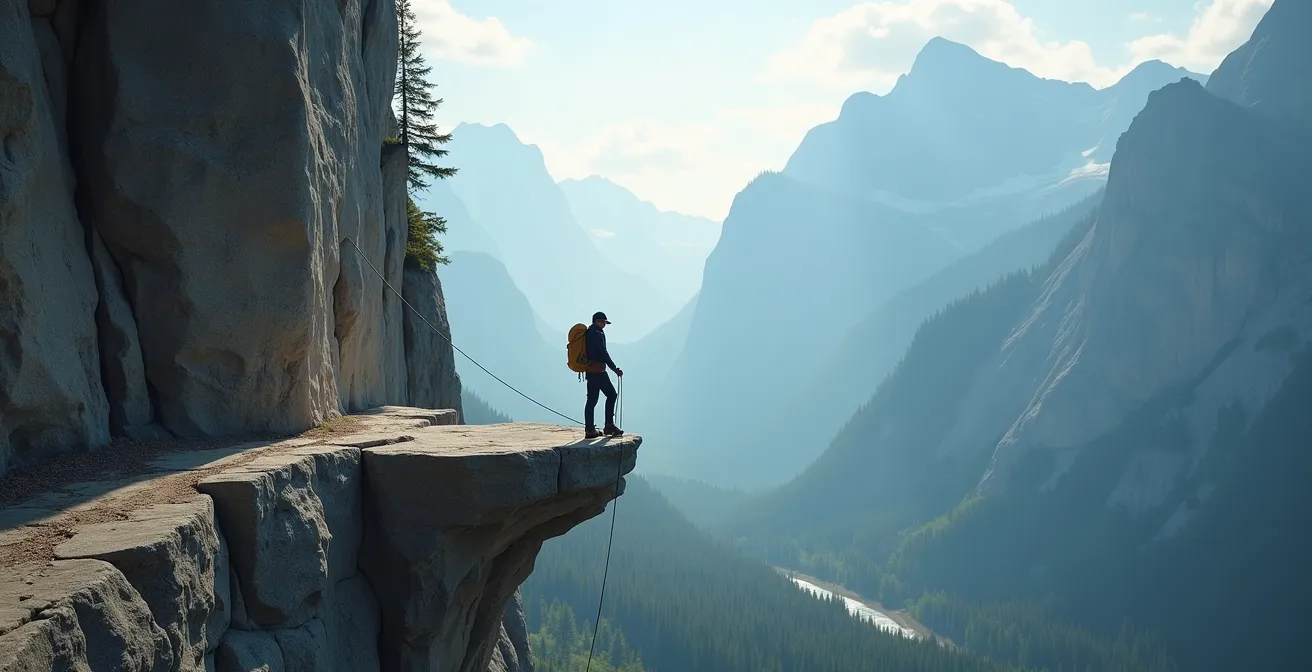
The Crypt Lake Trail in Waterton Lakes National Park is a legend. Consistently ranked among Canada’s most thrilling hikes, its allure is undeniable: a boat ride across a turquoise lake, a steep ascent, and the famous trifecta of a steel ladder, a 60-foot tunnel, and a cabled traverse along a sheer cliff face. For any moderately fit hiker, the question inevitably arises: “Can I do this?” The internet is filled with breathless accounts describing it as “scary but doable,” an “adventure of a lifetime.” This advice, while well-intentioned, is dangerously vague.
As a mountaineering guide, my job is to replace ambiguity with honest risk assessment. The common wisdom focuses on the obvious thrills, the “subjective hazards” of fear and vertigo. But it often misses the more insidious “objective hazards”—the real-world factors that can turn a challenging day into a dangerous one. Relying solely on your fitness or courage is a common mistake. The true challenge of a scramble like Crypt Lake isn’t a single obstacle, but a system of interconnected risks involving rock quality, weather windows, altitude, and the unique psychology of time pressure.
The key isn’t to ask if you’re brave enough, but if you’re prepared enough. This guide abandons the generic advice. Instead, we will deconstruct the trail’s risk system piece by piece. We will analyze the treacherous nature of polished limestone, explain concrete techniques to manage vertigo, and debate the critical choice between hiking boots and approach shoes. We will uncover the “summit trap” set by afternoon thunderstorms and explain why your marathon training might not help you at 2,500 meters. This is not about scaring you off the trail; it’s about equipping you with the knowledge to make an informed, safe decision.
This article provides a framework for assessing the real challenges of a high-consequence scramble. Below, we’ll explore each component of the risk system in detail, giving you the tools to decide if the Crypt Lake Trail is the right objective for you, right now.
Summary: Is the Crypt Lake Trail Too Dangerous? A Scrambler’s Guide to Real Risk
- Why Does Limestone Rock Quality Matter for Your Safety on a Scramble?
- Why Is Limestone Often Polished and Slippery on Popular Routes?
- How to Handle Vertigo on Exposed Ridges Without Freezing Up?
- Hiking Boots vs. Approach Shoes: Which Gives Better Grip on Granite?
- The Summit Trap: How Fast Can a Thunderstorm Form at 3000 Meters?
- Preventing Altitude Sickness: How to Pace Your Hike Above 2500 Meters?
- Cardio at Altitude: Does Training at Sea Level Prepare You for the Rockies?
- Banff or Jasper: Which National Park Is Better for Wildlife Viewing?
Why Does Limestone Rock Quality Matter for Your Safety on a Scramble?
When assessing a scramble, hikers often focus on the steepness or exposure. However, the type of rock under your feet is a fundamental, and often overlooked, component of the risk system. In the Canadian Rockies, many classic routes are on limestone or similar sedimentary rock like argillite. Unlike the rough, grippy granite found in other ranges, limestone has characteristics that demand respect and specific techniques. It is relatively soft and prone to erosion, meaning holds can be less reliable and more susceptible to breaking under weight.
Furthermore, limestone’s texture can be deceptive. While it can offer excellent friction when dry and coarse, its interaction with water and wear creates unique hazards. This isn’t just about being “slippery when wet”; the very nature of the rock changes with conditions. Understanding this is the first step in moving from a hiker’s mindset to a scrambler’s. You must learn to “read” the rock, assessing its stability, texture, and potential slipperiness before committing your full body weight to a handhold or foothold. For a beginner, this is a critical skill that is rarely learned on well-groomed valley-bottom trails.
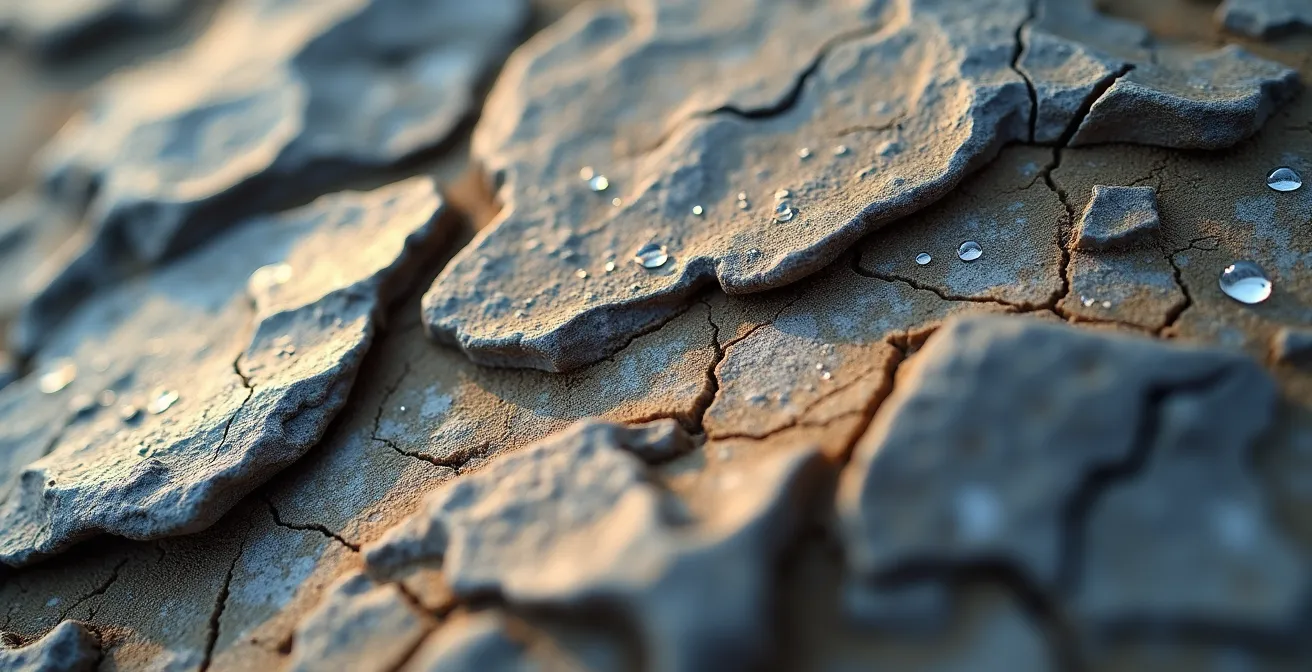
The image above highlights a key issue: rock polishing. The smooth, almost glassy sections are where thousands of boots have worn down the rock’s natural texture. This polished surface offers dramatically less friction, especially in damp conditions. Recognizing these wear patterns is crucial for safe route-finding on popular scrambles, as the most obvious path is often the most treacherous.
Why Is Limestone Often Polished and Slippery on Popular Routes?
The dangerous polishing on trails like Crypt Lake is not a natural phenomenon; it’s a direct result of popularity. Every footstep and trekking pole plant acts like a fine-grit sandpaper, slowly but surely eroding the rock’s microscopic texture. When you multiply this by thousands of visitors per season, the effect is profound. Indeed, trail usage data shows that the 3,909+ reviews for Crypt Lake indicate extremely high foot traffic, which is the primary engine of this polishing process.
This process creates a surface that is fundamentally different from the surrounding, untouched rock. The phenomenon is especially pronounced on soft sedimentary rock like the argillite found on sections of the Crypt Lake Trail. This rock type is particularly susceptible to being worn smooth.
Case Study: The Crypt Lake Trail’s Argillite Polishing
Crypt Lake’s cabled section is a perfect example of extreme rock polishing. The combination of three factors creates a uniquely treacherous surface: the route is on soft argillite; its status as one of Canada’s most iconic hikes guarantees thousands of annual visitors; and constant water seepage from the surrounding rock face keeps the path damp. This moisture doesn’t just make it wet; it acts as a lubricant on the non-porous, polished surface, creating conditions akin to walking on wet marble. This hazard is at its worst in humid or misty conditions, when the slipperiness can surprise even experienced hikers.
This polishing turns the most-traveled line—what would normally be the safest route—into the most hazardous one. A novice scrambler’s instinct is to follow the worn path, but on polished limestone or argillite, the safer choice is often to seek out rougher, less-traveled rock to the side, even if it looks steeper. This is a counter-intuitive but vital scrambling skill that directly contradicts the logic of standard hiking.
How to Handle Vertigo on Exposed Ridges Without Freezing Up?
Exposure—the feeling of open space below you—is a psychological challenge, not a technical one. Your ability to handle it has little to do with your physical fitness. For many, the first encounter with significant exposure, like the cabled ledge on the Crypt Lake Trail, can trigger vertigo and a paralyzing fear. Freezing up in such a location is a serious subjective hazard. The key to managing it isn’t brute courage, but a set of deliberate, practiced mental techniques.
First, it’s crucial to build tolerance gradually. Jumping from flat trails to a highly exposed scramble is a recipe for anxiety. An effective strategy is to follow a progression system, starting with hikes that have minimal exposure and working your way up. For instance, a visitor to the Rockies might start with a route like Sulphur Mountain in Banff, progress to the moderate exposure on Wilcox Pass, and only then attempt a major objective like Crypt Lake. This allows your mind to adapt to the sensation of height in controlled increments.
When you find yourself on an exposed section and feel anxiety rising, the goal is to shrink your world down to your immediate surroundings. Do not look down into the void, and do not fixate on the end of the traverse. Your entire focus should be on the next three to five feet of trail. Look at your handholds, your footholds, and the rock in front of you. By concentrating on the immediate task, you override the brain’s instinct to panic about the larger environment. This must be paired with controlled, rhythmic breathing to keep your heart rate down and your mind clear.
Your Action Plan: ACMG-Endorsed Techniques for Managing Exposure
- Practice Deliberate Gaze Control: Actively focus your eyes only on your next three points of contact (two feet, one hand). Do not let your gaze wander down.
- Implement Rhythmic Breathing: Inhale for four counts, exhale for four counts. A steady breathing pattern is clinically proven to reduce anxiety and prevent the fight-or-flight response.
- Look Back Frequently: While ascending, turn around and memorize landmarks. This familiarizes you with the view on descent and prevents the shock of looking down for the first time from a high point.
- Stay in the Present Moment: Focus entirely on your current movement. Do not think about how far you have to go or how far you’ve come. Scrambling is a walking meditation.
- React to Vertigo Immediately: If the sensation of spinning or falling strikes, immediately crouch down. Get your head below the level of the surrounding terrain and stay there until the feeling passes.
Hiking Boots vs. Approach Shoes: Which Gives Better Grip on Granite?
Your choice of footwear is one of the most consequential gear decisions you’ll make for a scramble, yet it’s where many beginners make a critical mistake. Traditional wisdom says to use sturdy hiking boots with deep lugs for ankle support and traction. While this is true for muddy trails and carrying heavy packs, it is flawed logic for the technical, rocky terrain of a scramble. On the polished limestone and angled slabs of the Crypt Lake Trail, the best tool for the job is often an approach shoe, not a hiking boot.
The difference lies in the rubber and sole design. Hiking boots use hard, durable rubber with deep lugs designed to bite into soft earth. On smooth, hard rock, these lugs can “skate” across the surface, offering very little contact area for friction. Approach shoes, born from the world of rock climbing, use a much softer, “stickier” rubber. They often feature a flat “climbing zone” at the toe, designed for maximizing surface contact and friction—a technique known as “smearing.” This provides vastly superior grip on the exact kind of polished, slabby terrain that makes scrambles like Crypt Lake so treacherous.
This is a data-driven decision, not just a matter of opinion. For example, comprehensive outdoor gear testing reveals that nearly all experienced climbers and scramblers choose approach shoes for technical terrain. The trade-off is ankle support. Approach shoes require strong, stable ankles, as they offer little of the rigid support found in boots. If you have a history of ankle injuries or plan to carry a very heavy pack, this must be a consideration. For the agile movement required on a scramble, however, the precision and grip of an approach shoe are often a more significant safety advantage.
The following table breaks down the key differences for scrambling in the Canadian Rockies:
| Feature | Approach Shoes | Hiking Boots |
|---|---|---|
| Rubber Type | Sticky rubber (Vibram Megagrip, La Sportiva FriXion) | Hard durometer lugs |
| Performance on Limestone | Superior smearing friction on polished slabs | Can ‘skate’ on smooth rock faces |
| Ankle Support | Minimal – requires strong ankles | Maximum support for heavy loads |
| Weight | Light (reduces fatigue on long scrambles) | Heavy (more tiring on technical sections) |
| Edge Control | Precise foot placement on small holds | Less precision due to thick sole |
The Summit Trap: How Fast Can a Thunderstorm Form at 3000 Meters?
In the Canadian Rockies, the weather is not just a passive element; it’s an active and predictable threat. The single greatest objective hazard for any summer scrambler is the afternoon thunderstorm. Due to regional weather patterns, clear, stable mornings often give way to rapidly building cumulus clouds after noon, leading to electrical storms, hail, and sudden temperature drops. At 3,000 meters, a thunderstorm can form with terrifying speed, turning a pleasant ridge walk into a life-threatening situation in under an hour. Being on an exposed summit or ridge during a lightning storm is one of the most dangerous places you can be in the mountains.
This predictable pattern creates what mountaineers call the “Summit Trap.” Hikers feel the pull of the summit, and even as clouds begin to build, they push onward, telling themselves they’re “almost there.” This is a fatal lapse in judgment. On a route like Crypt Lake, this trap is amplified by a logistical constraint: the ferry schedule.
Case Study: The Crypt Lake Ferry and Time-Pressure
The mandatory boat ride to and from the Crypt Lake trailhead creates a significant time-pressure trap. With the last pickup typically at 5:30 PM, hikers are on a strict clock. A late start or a slower-than-expected pace can lead to a desperate push for the summit in the early afternoon, precisely when thunderstorm risk is highest. This pressure can cause hikers to ignore clear warning signs in the sky, demonstrating how logistical factors can dramatically increase your exposure to objective hazards like lightning.
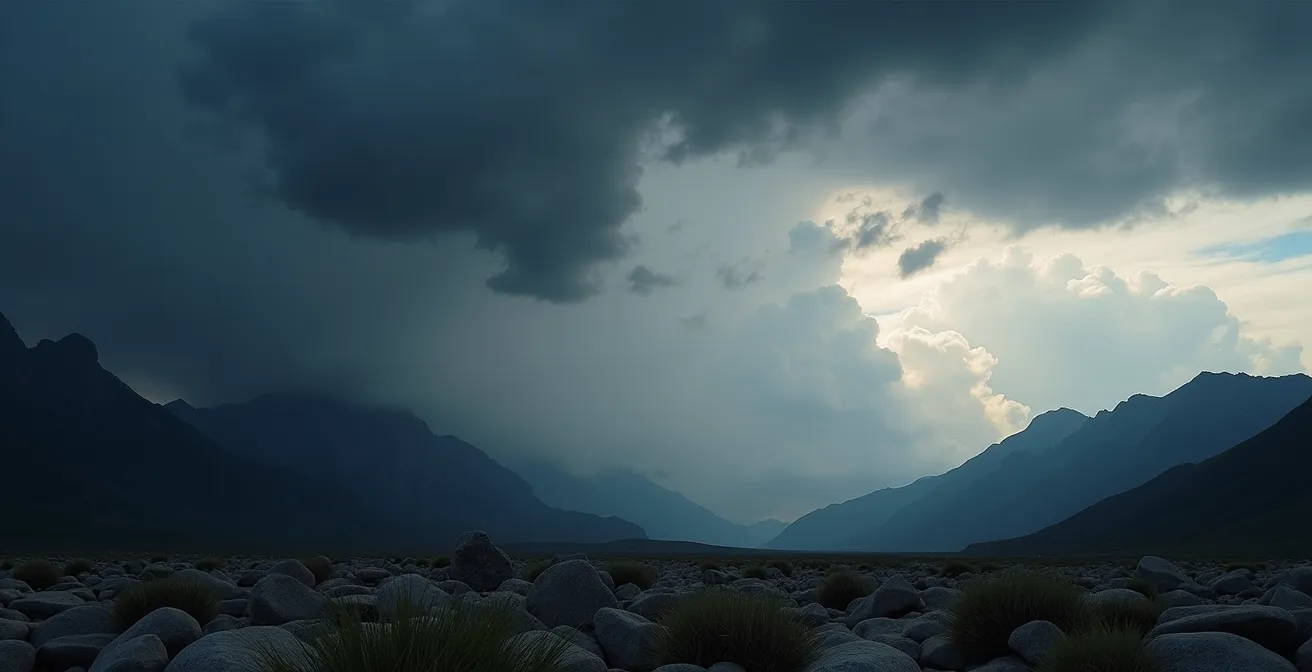
To avoid this trap, disciplined time management is essential. The golden rule for Rockies scrambling is the 12 PM Rule: plan your day to be off any exposed summits or ridges by noon, well before the period of maximum storm risk. This means a very early start. You must also use reliable forecasting tools. Generic weather apps are insufficient; specialized tools like SpotWx or lightning maps from Environment Canada are critical. If you are caught, descend immediately. Do not hide under trees or overhanging rocks. Find a low spot, crouch with your feet together, and insulate yourself from the ground by sitting on your pack.
Preventing Altitude Sickness: How to Pace Your Hike Above 2500 Meters?
For visitors to the Canadian Rockies, especially those arriving from sea level, altitude is a significant and often underestimated factor. Above 2,500 meters (8,200 feet), the air contains less oxygen, and your body needs time to adapt. Pushing too hard, too soon can lead to Acute Mountain Sickness (AMS), with symptoms ranging from headache and nausea to more severe, life-threatening conditions. The summit of the Crypt Lake scramble pushes into this altitude zone, making proper acclimatization and pacing non-negotiable.
Acclimatization is the process of allowing your body to gradually adjust to the lower oxygen levels. For visitors, this means planning your trip with altitude in mind. Flying into Calgary (1,048m) and immediately driving to attempt a high peak the next day is a common mistake. A much safer approach is to follow a structured itinerary: spend the first day on a low-elevation hike (like Grassi Lakes near Canmore), attempt a moderate peak below 2,500m on day two, and only then consider a high-altitude objective like Crypt Lake on day four or later. Scheduling rest days is also crucial.
Once on the trail, the most important tool you have is pacing. The goal is to maintain a “conversational pace.” This concept is a simple but powerful biofeedback tool. As the Canadian Academy of Sport and Exercise Medicine advises, your pace is correct if you can speak in full, comfortable sentences.
Hike at a conversational pace. If you are too breathless to speak in full sentences, you are ascending too quickly for your body to acclimatize, regardless of your cardio fitness.
– Canadian Academy of Sport and Exercise Medicine, CASEM Position Statement on Altitude Training
This rule forces you to listen to your body rather than your watch or your ego. If you’re gasping for air, you are red-lining your system and dramatically increasing your risk of AMS. Slow down until you can talk again. This is the single most effective technique for preventing altitude sickness during your ascent.
Key Takeaways
- Risk on a scramble is a system: It’s the interaction of rock type, weather, personal psychology, and even logistics like a ferry schedule.
- Your equipment and technique must be tailored to the specific hazard. Sticky rubber approach shoes beat hiking boots on polished rock, and a “conversational pace” beats raw fitness at altitude.
- Time management is a critical safety tool. An early start to be off the summit by noon is the best defense against the predictable threat of afternoon thunderstorms in the Rockies.
Cardio at Altitude: Does Training at Sea Level Prepare You for the Rockies?
Many hikers believe that a high level of cardiovascular fitness—being a strong runner or cyclist—will protect them from the effects of altitude. This is a dangerous misconception. While being fit certainly helps with the physical exertion of climbing a mountain, it offers no special protection against Acute Mountain Sickness (AMS). The physiological process of acclimatization is distinct from cardiovascular conditioning. A world-class marathon runner from sea level is just as susceptible to AMS as a less-fit person if they ascend too quickly.
This crucial point is emphasized by leading medical bodies. The American College of Cardiology makes it clear that fitness is not a shield against the physiological stress of low oxygen. Your body’s ability to adapt depends on gradual exposure, not on your VO2 max.
Important to the Care of Athletes Is That a High Level of Aerobic Fitness Is Not Protective Against Development of Acute Mountain Sickness.
– American College of Cardiology, Exercise and Elevation Guidelines
So, how should you train at sea level for a demanding Canadian Rockies scramble? The focus should be on building muscular endurance and strength for steep terrain, rather than just aerobic capacity. Your training should mimic the specific movements of scrambling. The best exercises include weighted stair-climbing or box step-ups with a 20-30 lb pack, sustained for 30-45 minutes. Find the steepest local hills you can and hike them repeatedly. For residents of Vancouver or Montreal, this could mean doing repeats on the Grouse Grind or up Mount Royal. Your goal should be to comfortably complete 1,000 meters (3,300 feet) of elevation gain in under four hours with a pack before you even leave for the Rockies. This type of specific, strength-based training will prepare your legs and core for the relentless upward push, allowing you to maintain a slow, steady, and safe “conversational pace” once you’re at altitude.
Banff or Jasper: Which National Park Is Better for Wildlife Viewing?
This is a common question, but from a scrambler’s perspective, it’s the wrong one to ask. Both Banff and Jasper National Parks host a spectacular and dense population of wildlife, including grizzly bears, black bears, elk, bighorn sheep, and mountain goats. The question isn’t “which park is better for viewing,” but rather, “in which park are you better prepared for the inevitable and potentially hazardous encounters?” When you leave the crowded viewpoints and venture onto scrambling routes, you are no longer a spectator; you are a guest in their habitat, and managing this risk becomes paramount.
Encounters on narrow trails or ledges are a serious concern. Parks Canada implements strict protocols in high-risk areas, which can include mandatory group travel. For example, Parks Canada safety data confirms that the Group Access Rule, requiring hikers to travel in tight groups of four or more, is often enforced on trails in the Moraine Lake area of Banff National Park during periods of high grizzly bear activity. This underscores the reality of sharing the terrain.
While bears get the most attention, they are not the only hazard. Mountain goats, often perceived as placid, are powerful animals that frequent the same steep, exposed ridges that scramblers seek out. An encounter in the wrong place can be extremely dangerous.
Case Study: Mountain Goat Encounters on Narrow Ridges
Mountain goats frequently use the same narrow ridges and ledges as scramblers in the Canadian Rockies. On advanced routes like the ridge beyond Crypt Lake, encounters are common. These animals can be territorial and unpredictable. Being confronted by a goat on a narrow ledge with a sheer drop can force a scrambler into a precarious position or off their intended route. The correct response is not to challenge the animal, but to give it a wide berth and wait patiently—sometimes for a long time—for it to move on. This requires patience and a solid understanding of animal behaviour, skills as important as any technical climbing ability.
The “better” park for wildlife viewing is whichever one you enter with the proper respect, knowledge, and equipment. This includes carrying bear spray and knowing how to use it, making constant noise, never wearing headphones, and reporting all encounters to Parks Canada. The thrill of seeing a grizzly or a goat from the trail is matched by the responsibility to keep yourself, and them, safe.
Now that you are equipped with a framework for assessing the complete risk system of a scramble, the next step is to apply this thinking to all your future mountain adventures. This methodical approach—analyzing rock, weather, altitude, wildlife, and your own psychology—is the true mark of a competent and safe mountaineer.