The immense frustration of searching for blue whales in the St. Lawrence stems from a common misconception: that finding one is a matter of luck. The reality is that successful spotting relies on a systematic approach. This guide shifts the focus from hopeful scanning to a professional methodology, teaching you to decode environmental cues, understand whale behaviour, and use the right equipment to dramatically increase your chances of witnessing the world’s largest animal.
There’s a unique silence that falls over a boat in the St. Lawrence when someone thinks they’ve seen one. A flash of blue-grey skin, a plume of mist hanging in the air. For many wildlife enthusiasts, the blue whale is the ultimate prize, a magnificent ghost of the estuary. Yet, more often than not, the experience ends in frustration. You spend hours scanning the vast, grey water, your eyes straining, only to return to shore with stories of minke whales and seals, but not the giant you came for. The common advice—”look for a big spout,” “be patient”—feels hollow when the ocean remains stubbornly empty.
Most guides will tell you it’s a numbers game, a lottery. But what if the challenge isn’t about luck, but about a lack of the right knowledge? What if the professional spotters aren’t just lucky, but are actively reading a language you haven’t been taught? The secret to finding blue whales isn’t about looking harder; it’s about looking smarter. It involves understanding the subtle differences between species, the physics of your optics, and the powerful, invisible currents that dictate where a whale will feed.
This is the perspective of a seasoned guide. We don’t just hope to stumble upon a blue whale. We build a case for its presence, layer by layer. This article will walk you through that professional system. We’ll move from basic identification to the advanced techniques of predicting a whale’s location based on the very rhythm of the ocean itself. You will learn to trade frustration for a focused, methodical strategy that transforms your whale watching from a game of chance into a science.
To guide you through this process, this article is structured to build your expertise systematically, from fundamental identification skills to advanced environmental analysis. Each section is a step toward mastering the art of spotting the St. Lawrence’s most elusive giant.
Summary: The Elusive Giant of the St. Lawrence
- Blue vs. Fin Whale: How to Distinguish Them by Their Blow Spouts?
- Binocular Specs: Why Is 7×50 the Standard for Marine Spotting?
- Saguenay Fjord vs. Gaspe: Where Is the Blue Whale Probability Higher?
- The Harassment Definition: What Actions Will Get You Fined by Transport Canada?
- Tidal Feeding: Why Is High Tide Often Better for Shore-Based Spotting?
- Breach Prediction: How to Spot the Surface Signs Before a Whale Jumps?
- Wide-Angle Lens vs. Telephoto: Which is Essential for Banff National Park?
- Whale Watching from Private Boats: What Is the Legal Distance in Canada?
Blue vs. Fin Whale: How to Distinguish Them by Their Blow Spouts?
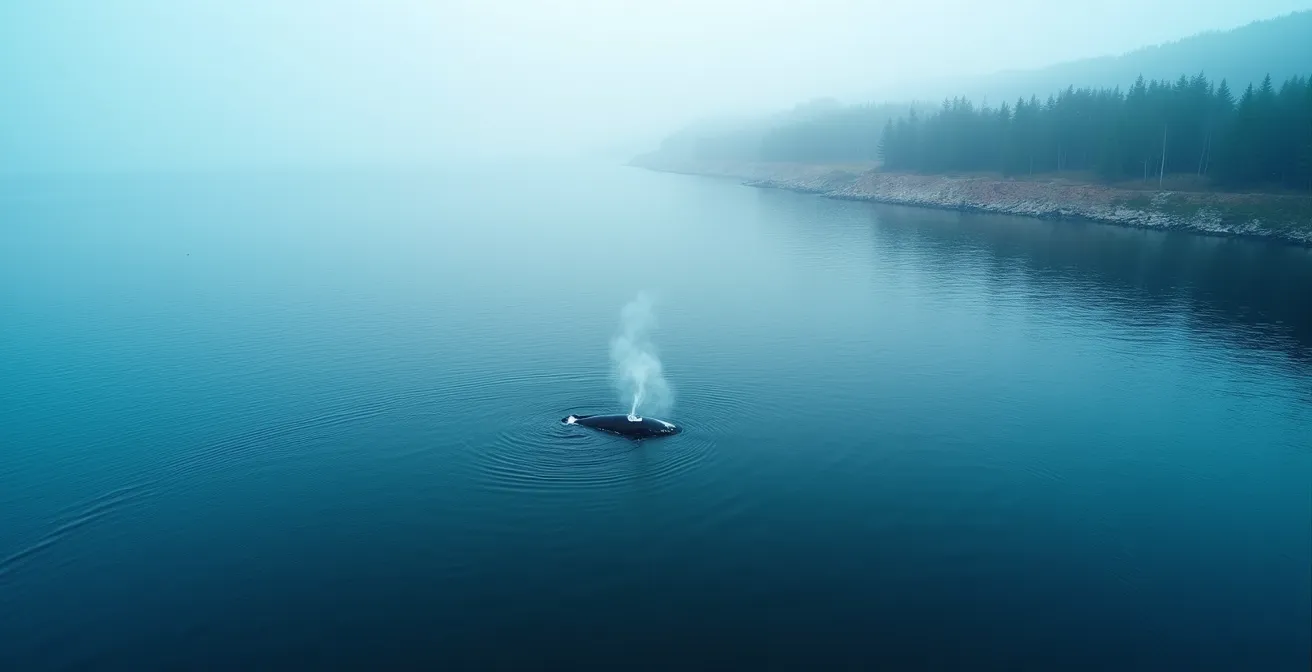
The first mistake a frustrated spotter makes is misidentification. A distant spout sends a jolt of excitement, but minutes later, a sleek, dark back and a prominent dorsal fin confirm it’s a fin whale—a magnificent animal, but not the one you’re seeking. To avoid this common pitfall, you must learn to read the very first clue: the blow. A blue whale’s exhalation is unmistakable once you know what to look for. It is an explosive, powerful column of mist that rises perfectly vertically to a height of 9 to 12 meters. It hangs in the calm air like a tall, narrow exclamation point.
In contrast, the fin whale’s blow is less than half the height, typically 4 to 6 meters, and is visibly angled backward. The shape is more diffuse, like a cone rather than a column. This difference is your most reliable long-distance indicator. Beyond the spout, the dive sequence provides the next critical clue. Just before a deep dive, a blue whale will often raise its enormous, broad tail flukes high out of the water. This is a truly iconic sight that fin whales in the St. Lawrence rarely, if ever, display. Finally, pay attention to the timing and appearance of the dorsal fin. A blue whale’s dorsal is disproportionately tiny and appears very late, long after the blow has dissipated and the vast expanse of its back has rolled past. A fin whale’s more prominent, curved dorsal fin appears almost simultaneously with its blow, a key giveaway.
This systematic identification, documented over decades by research groups like the Mingan Island Cetacean Study (MICS), is the foundation of effective spotting. They have collected data on individual blue whales since 1980, using these very characteristics to track populations. By focusing on these key differences, you stop chasing every spout and start focusing only on the high-probability targets.
Binocular Specs: Why Is 7×50 the Standard for Marine Spotting?
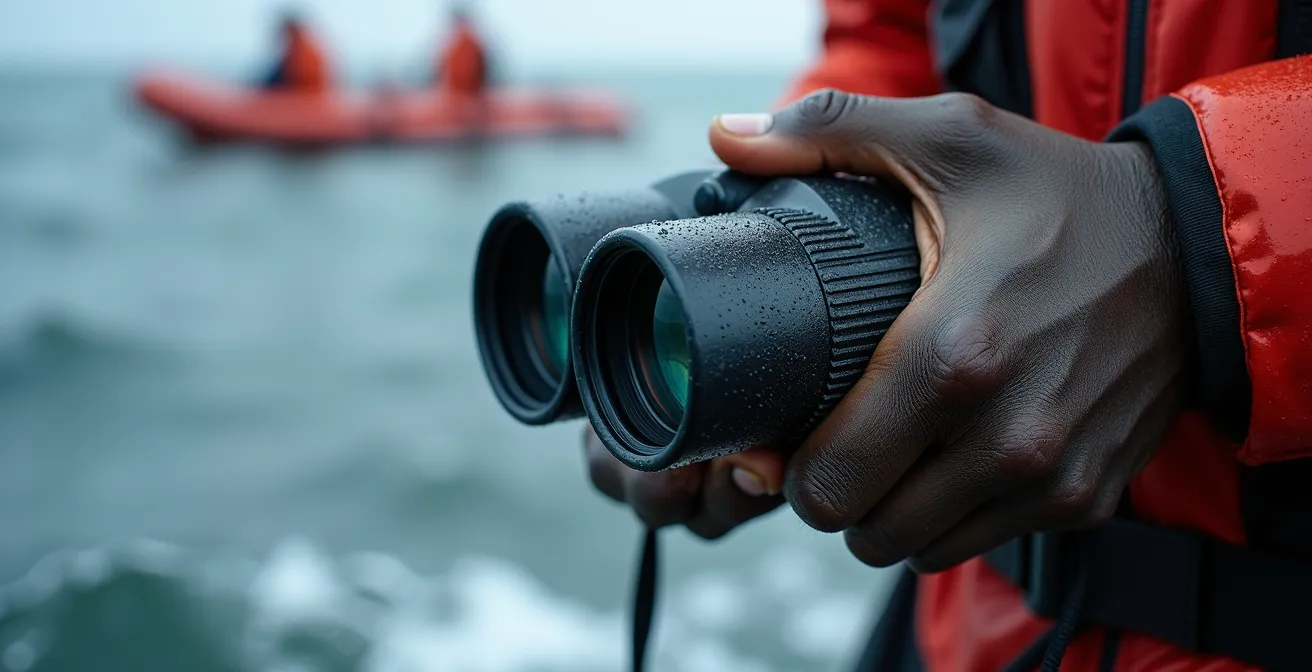
Once you know what to look for, you need the right tool to see it clearly, especially on a moving boat in the variable light of the St. Lawrence. While many visitors bring powerful 10x or 12x bird-watching binoculars, seasoned marine observers almost universally choose the 7×50 specification. The reason isn’t magnification, but stability and light gathering. The ‘7x’ magnification is the sweet spot; it’s powerful enough to bring distant details into focus but low enough to mitigate the hand shake and boat motion that make higher-powered optics unusable on water. Trying to hold a 10x binocular steady on a choppy sea results in a jittery, nauseating image.
The ’50’ in 7×50 refers to the 50mm objective lens diameter. This large lens is crucial for performance in the often-overcast or low-light conditions of dawn and dusk, when whales can be most active. It determines the “exit pupil,” a measure of how much light reaches your eye. As marine optics experts calculate, 7×50 binoculars provide a large 7.1mm exit pupil, which is significantly brighter than the 5.25mm of a standard 8×42 model. This means a clearer, brighter image when light is poor, allowing you to pick out the subtle, mottled blue-grey pattern of a whale’s skin against a dark sea.
This technical superiority is why professional-grade marine binoculars are almost always 7×50. They are built for the specific challenges of the marine environment: maximizing stability and light, often at the expense of raw power or light weight.
As you can see, choosing the right equipment is a strategic decision. The table below, based on common specifications for St. Lawrence conditions, highlights why the 7×50 model is the undisputed standard for serious whale watchers who prioritize a stable, bright image over sheer magnification.
| Feature | 7×50 Marine | 10×50 Standard | 8×42 Compact |
|---|---|---|---|
| Field of View | 7.5° (390 ft/1000 yds) | 5.7° (300 ft/1000 yds) | 6.8° (355 ft/1000 yds) |
| Image Stability on Boat | Excellent | Poor (excessive shake) | Good |
| Low Light Performance | Superior (7.1mm exit pupil) | Good (5mm exit pupil) | Moderate (5.25mm exit pupil) |
| Weight | 35-40 oz | 32-38 oz | 24-28 oz |
| Fog/Waterproof Rating | IPX7 standard | Varies | IPX6 typical |
Saguenay Fjord vs. Gaspe: Where Is the Blue Whale Probability Higher?
With the right skills and tools, the next question is location. The St. Lawrence is immense, but blue whales don’t distribute themselves evenly. They congregate in specific areas where the underwater topography creates an all-you-can-eat buffet of krill. Your highest probability of a sighting lies at the head of the Laurentian Channel, a deep submarine valley that acts as a funnel. This places the prime blue whale territory squarely in the sector between Les Escoumins and the Gaspé Peninsula, at the entrance to the Gulf of St. Lawrence.
While the Saguenay-St. Lawrence Marine Park near Tadoussac is world-famous for its abundance of minke and fin whales, and its spectacular humpback sightings, blue whales tend to favour the deeper, broader waters further downstream. Research from Fisheries and Oceans Canada’s habitat modeling confirms this, identifying the Gulf of St. Lawrence as one of the most suitable habitats. The sheer scale and depth of this area better accommodate the feeding patterns and needs of a 30-meter-long animal.
Timing is as critical as location. Blue whales are migratory, and their presence in the St. Lawrence peaks late in the season. While whale watching tours run all summer, your odds for a blue whale encounter increase dramatically later in the year. Data from local operators consistently shows that the period from August to September has the highest concentration of blue whale sightings. Planning your trip for the late summer or early fall aligns your search with their peak presence, maximizing your chances in these high-probability zones.
The Harassment Definition: What Actions Will Get You Fined by Transport Canada?
In the excitement of a potential sighting, it’s easy to forget that we are guests in a fragile and protected environment. Understanding and respecting the rules isn’t just about avoiding fines; it’s a fundamental part of an ethical and ultimately more rewarding whale watching experience. In Canada, marine mammal protection is not a suggestion—it’s the law. The term “harassment” or “disturbance” has a clear legal definition under the Marine Mammal Regulations, and it covers more than just getting too close.
Harassment is defined as any action that disrupts a whale’s normal behaviour. This includes:
- Repeatedly trying to approach the animal.
- Separating a whale from its group or a mother from her calf.
- Making loud or sudden noises.
- Chasing or pursuing the animal.
- Tagging or marking a marine mammal.
The most critical and enforced rule is the minimum approach distance. For most whales in the St. Lawrence, this is 100 meters. However, for endangered species, the rules are much stricter. Because the St. Lawrence blue whale population is designated as endangered, Canada’s Marine Mammal Regulations require a 400-meter mandatory distance. That’s nearly four football fields. Approaching a blue whale within this limit, whether intentionally or not, is a federal offense and can result in significant fines from Transport Canada or Fisheries and Oceans Canada.
As a guide, we see this as a pact of respect. By keeping our distance, we ensure the whales can feed, rest, and socialize without stress. This not only protects the animals but also often leads to better, more natural sightings. A stressed whale will dive deep and disappear; a calm whale may surface repeatedly, offering extended views from a respectful and legal distance.
Tidal Feeding: Why Is High Tide Often Better for Shore-Based Spotting?
For those hoping to spot a blue whale without setting foot on a boat, locations like Cap de Bon-Désir and the Pointe-Noire Interpretation and Observation Centre offer fantastic opportunities. However, simply showing up and hoping for the best is a recipe for disappointment. The secret to successful shore-based spotting is to synchronize your visit with the ocean’s rhythm: the tides. The powerful semidiurnal tides in the Tadoussac area, changing every six hours, are the engine of the entire ecosystem.
The magic happens on the rising tide. As the tide comes in, it pushes immense volumes of cold, nutrient-rich water from the deep Laurentian Channel up against the steep underwater cliffs of the Tadoussac Shelf. This phenomenon, known as upwelling, forces krill—the primary food for blue whales—to the surface in massive concentrations. Whales are intelligent feeders; they don’t waste energy searching the vast ocean. They go where the food is concentrated. By timing your observation with the high tide, you are placing yourself at the dinner table exactly when the meal is being served.
This isn’t folklore; it’s a well-documented ecological process. The tidal currents create predictable “golden windows” for feeding activity. Your strategy should be to arrive about two hours before high tide and stay for at least an hour after. This window covers the entire cycle of maximum upwelling and surface feeding.
Watching the water is only part of the equation; you should also watch the sky. Large aggregations of seabirds, especially northern gannets, diving into the water are a clear sign that krill is near the surface. Following their activity can point you directly to a potential whale sighting.
Action Plan: Optimal Tide Timing for Shore Spotting
- Check Canadian tide charts online for specific sites like Cap de Bon-Désir and Pointe-Noire.
- Plan your arrival 2 hours before high tide to catch the beginning of the upwelling cycle.
- Stay through 1 hour after high tide for the complete ‘golden window’ of feeding activity.
- Watch for seabird aggregations (gulls, northern gannets) as indicators of surface krill.
- Position yourself on the downstream side of promontories where currents concentrate prey.
Breach Prediction: How to Spot the Surface Signs Before a Whale Jumps?
The image of a whale breaching—launching its entire body out of the water—is one of the most iconic in the natural world. Many visitors come to the St. Lawrence hoping to witness this spectacle from a blue whale. Here, however, we must manage expectations with a dose of scientific reality. A blue whale breach is an almost mythical event; their sheer size and body structure are not made for the acrobatics we see from humpbacks or right whales.
As the experts at the Group for Research and Education on Marine Mammals (GREMM) often point out, the most dramatic surface behaviour you should be looking for is not breaching, but lunge-feeding.
Blue whales are not built for acrobatics; their most dramatic surface behavior in the St. Lawrence is lunge-feeding, which is what observers should look for instead.
– GREMM Research Team, Baleines en Direct – St. Lawrence Marine Mammal Education
Lunge-feeding is an explosive and awe-inspiring event in itself. The whale accelerates towards a dense patch of krill, often rolling onto its side and opening its mouth to engulf tons of water and food. Spotting this requires you to learn the subtle pre-lunge behaviours. A whale preparing to lunge-feed will often take a series of 3 to 5 quick, shallow breaths in rapid succession to oxygenate its muscles. You may see it arch its back slightly higher than usual before it begins to roll, revealing the pleated throat that will soon expand like an enormous accordion. Learning to recognize these signs allows you to have your binoculars and camera ready for the moment of action.
Predicting this behaviour is the mark of an advanced observer. It requires patience and a focus on the right cues, rather than a hopeful search for a gravity-defying leap.
- Watch for a series of 3-5 quick, shallow breaths.
- Notice a higher-than-normal arching of the back.
- Look for the whale starting to roll onto its side near the surface.
- Observe the pleated throat area beginning to expand.
- Identify the ‘footprint’—a large, calm circular patch of water left after the final propulsive downstroke of the tail.
After a lunge-feeding series at the surface, a blue whale will typically make a deep dive lasting 10-20 minutes to process its meal. Timing these intervals is another key part of your predictive toolkit.
Wide-Angle Lens vs. Telephoto: Which is Essential for Banff National Park?
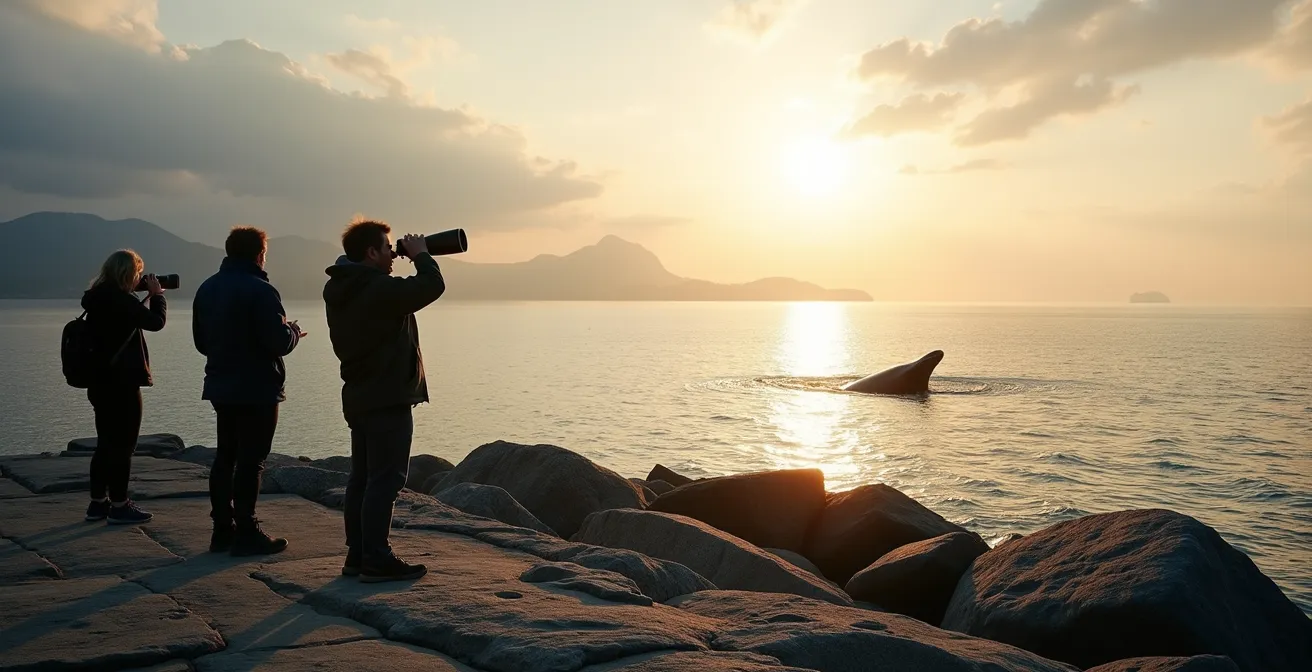
Photographing a blue whale is the ultimate challenge, combining the difficulties of wildlife photography with the legal constraints of marine observation. The question of lens choice—wide-angle or telephoto—is not an either/or proposition; a serious photographer needs both to tell the full story. However, for capturing the whale itself, a powerful telephoto lens is non-negotiable. Given that Canada’s mandatory approach distances require photographers to stay 400 meters away, a standard lens will render the whale as a tiny speck in the frame.
To get any meaningful detail—the pattern of mottling on its back, the shape of its fluke, the spray of its blow—you need significant reach. A minimum of a 300mm lens is required, but a 400mm, 500mm, or even 600mm lens is ideal. These lenses are heavy, expensive, and difficult to stabilize on a moving boat, but they are the only tools that can bridge the 400-meter gap and capture the powerful, frame-filling images that do justice to the animal’s scale.
So where does the wide-angle lens (e.g., 14-35mm) fit in? It’s for context and atmosphere. A wide-angle shot can’t capture the whale in detail, but it can capture the sense of place. It shows the sheer scale of the St. Lawrence landscape, the dramatic clouds, the boat full of awe-struck observers, with the distant whale as a small but vital element in the scene. It tells the story of the search and the environment. The most prepared photographers often work with two camera bodies, one with a telephoto for the whale and one with a wide-angle for the landscape, allowing them to switch instantly as the scene unfolds.
Key Takeaways
- Success in spotting blue whales is not luck; it’s a system based on knowledge of behaviour, environment, and regulations.
- Mastering identification (blow, dive, dorsal fin) and using the right equipment (7×50 binoculars) are foundational skills.
- Focus your efforts on high-probability areas (downstream of Tadoussac) during the peak season (August-September) and align shore-based observation with high tide.
Whale Watching from Private Boats: What Is the Legal Distance in Canada?
For private boaters, the freedom of the open water brings a special responsibility. While tour boats have certified captains trained in marine regulations, it is up to you as the operator of a private vessel to know and respect the law. As we’ve established, the general rule for an endangered blue whale is a 400-meter minimum approach distance. However, the regulations are even more stringent in certain critical areas.
In the heart of the whale’s summer feeding grounds, the Canadian government has established specific high-concentration zones. Federal regulations establish that a 200-meter minimum distance is required for all whales within a designated area adjacent to the Saguenay-St. Lawrence Marine Park. Navigating these waters requires not just a ruler on a map but a constant state of vigilance. The best practice is to always cut your engine or go neutral if a whale surfaces unexpectedly within your proximity, and only move away slowly once you are sure of the animal’s location and direction of travel.
But your role as a private boater can go beyond simple observation. You have an opportunity to become a valuable part of the research and conservation effort. Organizations like the Mingan Island Cetacean Study (MICS) and GREMM rely on “citizen science” to help monitor whale populations. By photographing the dorsal fins or tail flukes of the whales you see and submitting these images with location data, you can help researchers identify individual animals. Each blue whale has a unique mottling pattern, like a fingerprint. Your sighting can provide a crucial data point, helping to track the movements and health of the 400-or-so blue whales that visit the St. Lawrence each year. This transforms your trip from a personal quest into a meaningful contribution to the survival of the species.
By transforming your approach from a hopeful tourist to a knowledgeable, respectful observer, you not only increase your chances of a profound encounter but also become an ally in the protection of the St. Lawrence’s fragile ecosystem. Your next step is to take this knowledge and apply it, turning every trip onto the water into an opportunity for systematic observation and, potentially, scientific contribution.