In summary:
- Standard gear lists are insufficient; the Yukon’s environment (permafrost, magnetic fields) requires specialized equipment.
- Safety is not just about having gear, but understanding why it’s necessary—from waste disposal on tundra to satellite device choice.
- Navigational tools must be chosen and calibrated to account for extreme magnetic declination unique to northern latitudes.
- Adhering to legal wildlife viewing distances is an ethical duty that directly impacts your choice of photography equipment.
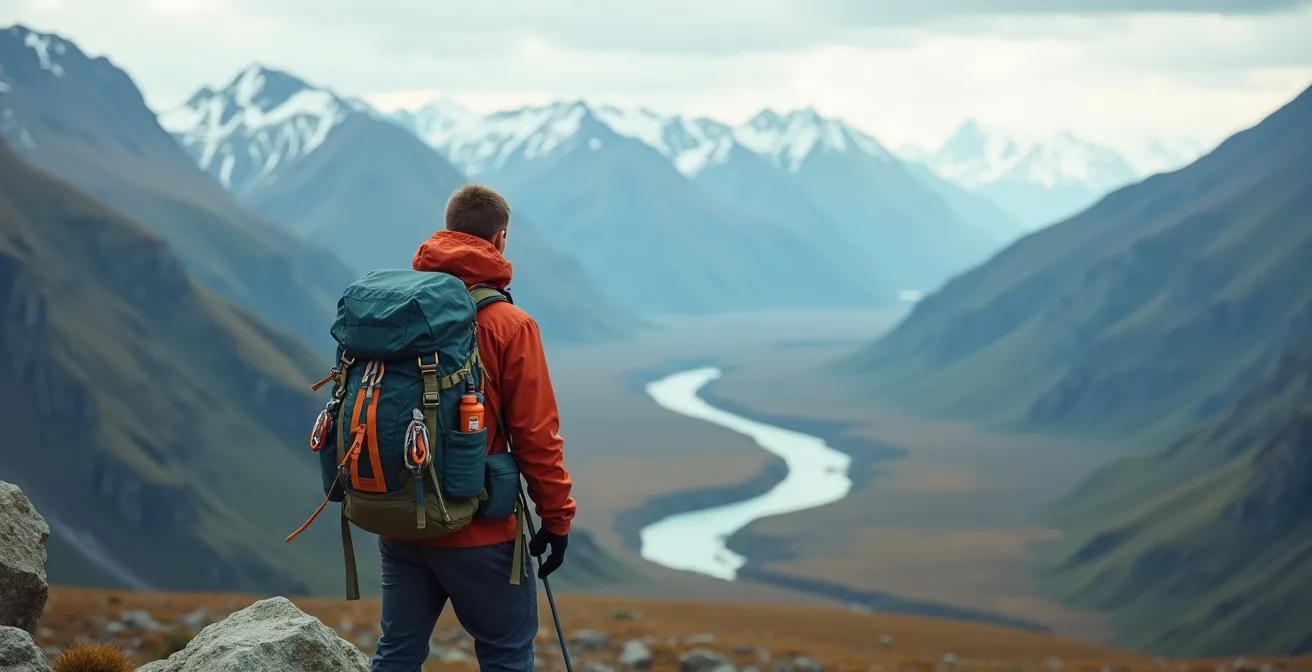
The call of the Yukon is a powerful one. It promises vast, silent landscapes, untamed wildlife, and a profound sense of solitude that feels a world away from urban life. For the adventurer planning to answer that call, preparation is everything. Most experienced travelers start with the basics: a solid layering system, a first-aid kit, and perhaps some bear spray. They pack what they believe to be the “ten essentials” and assume they are ready for anything.
However, as a wilderness survival expert based in Whitehorse, I’ve seen firsthand how this standard approach can fall dangerously short. The Yukon isn’t just any wilderness; it’s a unique environment with specific challenges that render generic advice inadequate. The real risks lie not in what’s on the typical packing list, but in what’s missing—the nuanced understanding of the local conditions.
But what if the key to true safety wasn’t just in packing a list, but in understanding the consequences? What if your compass could lie to you, your method of digging a cathole could harm the environment for decades, and your choice of camera lens could mean the difference between an ethical encounter and a death sentence for a wild animal? This guide moves beyond the platitudes. We will not just tell you *what* to pack, but explain *why* each piece of specialized gear is a non-negotiable link in your survival chain, dictated by the Yukon’s demanding and magnificent reality.
This article breaks down the critical gear considerations that are often overlooked, providing the expert context needed to navigate the North safely and responsibly. From communication devices to camera lenses, you will learn how to build a kit that is truly prepared for the unique demands of the Yukon.
Summary: Essential Gear for a Safe Yukon Expedition
- Why Does Total Silence Unsettle Some Urban Travelers in the North?
- How to Poop in the Woods: The Leave No Trace Guide for Tundra Environments
- Satellite Phone vs. PLB: Which Emergency Device Do You Need for Solo Trips?
- The Disorientation Risk: How Magnetism Affects Compasses Near the North Pole
- Bear Canister vs. Hang Bag: What is Required in Northern Backcountry?
- GPS Device vs. Paper Map: Which Is More Reliable in Dense Canopy?
- Telephoto Necessity: Why You Need at least 400mm for Safe Wildlife Shots?
- Wildlife Photography Ethics: How Close Can You Legally Get to Northern Fauna?
Why Does Total Silence Unsettle Some Urban Travelers in the North?
One of the first things that strikes visitors to the Yukon backcountry is the profound silence. For those accustomed to the constant hum of a city, this absence of noise can be deeply unsettling, even leading to anxiety. This isn’t just a feeling; it’s a psychological adjustment to a completely different sensory environment. Urban brains are trained to filter out constant, low-level noise. When that noise vanishes, the brain can sometimes interpret the void as a threat, heightening alertness and unease. The irony is that research demonstrates wilderness solo experiences can be a powerful antidote to urban stress.
Preparing for this psychological shift is a crucial, yet often ignored, part of your safety gear. It’s about psychological acclimatization. Instead of fighting the silence, you need to learn to embrace it and recalibrate your senses. This involves pre-trip preparation and a gradual immersion process. The goal is to reframe silence not as an empty void, but as a rich tapestry of subtle, natural sounds—the wind in the alpine, the distant call of a loon, the rustle of a ground squirrel. Learning to read these sounds is a fundamental wilderness skill.
To help with this transition, you can practice a form of sensory tapering. Before your trip, spend time in quiet local parks without headphones. During the first day or two of your expedition, you might use a single earbud with a low-volume podcast or quiet music to ease the transition. Then, gradually wean yourself off the artificial sound until the natural soundscape becomes your new normal. This practice transforms a source of anxiety into a tool for greater connection with your surroundings, enhancing both your safety and your enjoyment of the experience.
How to Poop in the Woods: The Leave No Trace Guide for Tundra Environments
While it may seem like a trivial topic, improper disposal of human waste is a serious environmental issue in the North. The standard backpacker advice—”dig a cathole 6-8 inches deep”—is fundamentally flawed and irresponsible in many parts of the Yukon. The reason lies in the region’s unique geology: permafrost and shallow, organic soil. Much of the northern terrain is tundra, where the soil layer is thin and the ground beneath it is frozen year-round.
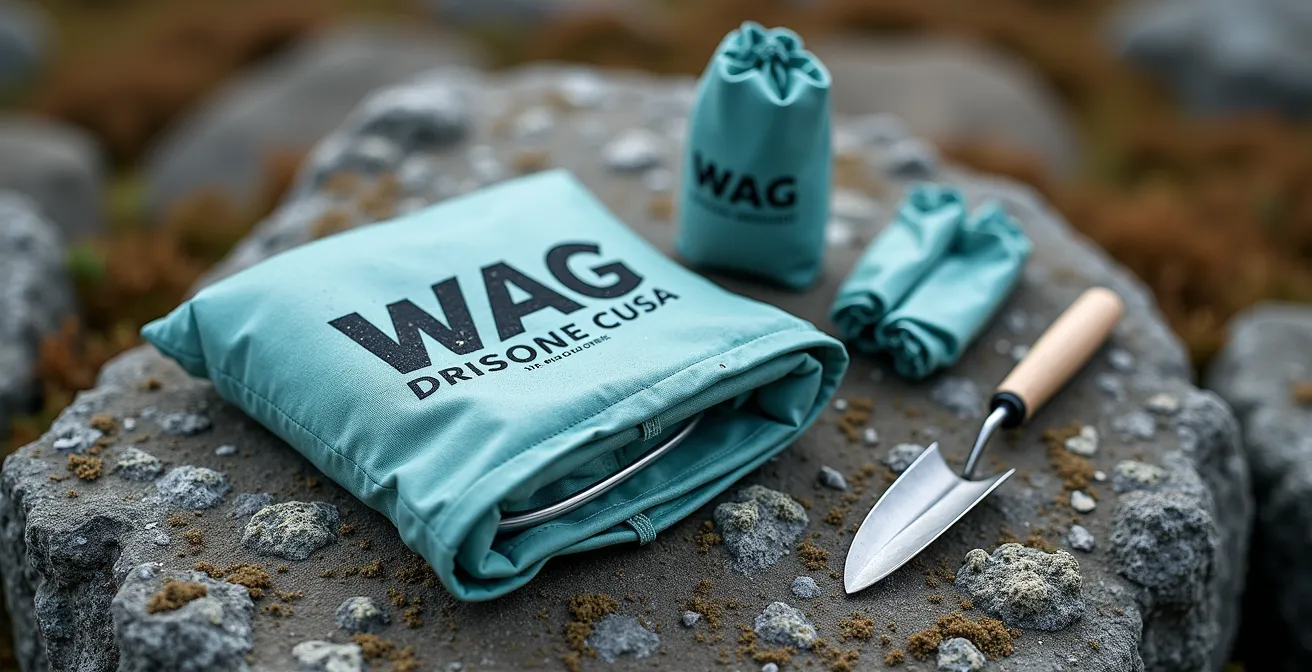
In these conditions, waste doesn’t biodegrade effectively. The cold temperatures and lack of microbial activity mean a cathole can preserve waste for decades, creating health hazards for wildlife and other visitors. This is a core tenet of Leave No Trace Canada guidelines for northern environments. The environmental specificity of the tundra demands a different approach. The only responsible method is to pack out all solid human waste. This is achieved using a commercial WAG (Waste Alleviation and Gelling) bag or a similar portable toilet system. These kits contain a biodegradable bag with a gelling powder that neutralizes odors and solidifies liquid waste, making it sanitary and easy to pack out.
The seriousness of this issue is highlighted by the Chilkoot Trail’s waste management strategy. This popular trail, which sees about 2,500 hikers a year, has to fly out waste barrels from its outhouses by helicopter because the sensitive terrain prevents digging. This operation costs roughly $20,000 annually, a stark reminder of the immense challenge and expense of managing human impact in the North. By packing out your waste, you are taking personal responsibility and protecting the fragile ecosystem you came to enjoy.
Satellite Phone vs. PLB: Which Emergency Device Do You Need for Solo Trips?
Once you leave the Alaska Highway, cell service in the Yukon vanishes. For any backcountry trip, a satellite communication device is not a luxury; it is an essential piece of safety equipment. The choice, however, isn’t as simple as just “getting a sat phone.” You have three main options: a Personal Locator Beacon (PLB), a satellite messenger (like an InReach or Zoleo), or a satellite phone. The right choice depends on your trip’s duration, complexity, risk level, and budget. This is a critical aspect of consequence-aware packing.
A PLB is the simplest and often most affordable option. It does one thing: send an SOS signal with your location to emergency responders. There’s no two-way communication. A satellite messenger is a step up, allowing you to send and receive text messages, trigger an SOS, and allow others to track your progress. A satellite phone offers full voice communication, which is invaluable for complex emergencies where you need to coordinate a response or self-evacuate. The choice involves a trade-off between functionality, battery life, and cost, with rental prices in Canada varying significantly between device types.
This comparative table breaks down the key differences to help you make an informed decision based on Canadian rental costs and northern performance considerations.
| Feature | PLB (Personal Locator Beacon) | Satellite Messenger (InReach/Zoleo) | Satellite Phone |
|---|---|---|---|
| Emergency Response Time | 24-48 hours typical | Can specify urgency level | Immediate voice contact |
| Two-way Communication | No – SOS only | Yes – text messaging | Yes – voice calls |
| Battery Life | 5+ years standby | 2-7 days active use | 8-30 hours talk time |
| Typical 2-week Rental Cost | $80-120 CAD | $150-250 CAD | $350-500 CAD |
| Coverage in Deep Valleys | Limited | Variable (Iridium better) | Best with external antenna |
For most solo hikers on established routes, a satellite messenger offers the best balance of safety and communication. For those leading groups or undertaking exploratory expeditions in extremely remote areas, the immediate two-way voice capability of a satellite phone is indispensable.
The Disorientation Risk: How Magnetism Affects Compasses Near the North Pole
Every basic survival guide tells you to carry a map and compass. In the Yukon, this advice is incomplete to the point of being dangerous. While a map is essential, a standard compass can become unreliable or completely useless due to the region’s proximity to the magnetic North Pole. Two phenomena are at play: magnetic declination and magnetic dip. Declination is the angle between true north (the geographic pole) and magnetic north. In the Yukon, this can be a staggering 20 to 25 degrees, an error that will send you miles off course if not corrected.
Even more problematic is “magnetic dip.” This is the vertical pull on the compass needle, which tries to point down into the earth as well as north. As Natural Resources Canada explains, this effect is so pronounced in the North that it can cause the compass needle to drag on its housing, freezing it in place. As they note in their analysis of northern magnetism:
In the Yukon, magnetic dip – the vertical pull on compass needles – is so strong it can cause the needle to drag on its housing, rendering standard compasses useless.
– Natural Resources Canada, Magnetic Declination and Dip in Northern Territories
To navigate safely, you need a compass designed for this environment—one with a “global needle” or balanced for the Northern Hemisphere (Zone 1). More importantly, you must know how to set your declination *before* you lose cell signal. This is a non-negotiable step in your pre-trip preparations and a perfect example of the environmental specificity required for Yukon travel.
Your Action Plan: Calibrating a Compass for the Yukon
- Points of Contact: Identify the exact tools you’ll use for navigation, ensuring your compass model is a “global needle” or “Zone 1” type suitable for northern latitudes.
- Data Collection: Before your trip, use Natural Resources Canada’s online magnetic declination calculator to find the precise declination value for your specific Yukon location and travel dates.
- Consistency Check: Confront the data with your equipment. Verify that your compass model allows for declination adjustment, as basic models do not.
- Pre-trip Action: Physically pre-set the declination adjustment on your compass while you still have a reliable internet connection and can double-check the value.
- In-field Integration: Upon arrival in the backcountry, verify your compass setting against a known landmark or a GPS waypoint before relying on it for primary navigation.
Bear Canister vs. Hang Bag: What is Required in Northern Backcountry?
“Be bear aware” is the mantra of the North, and proper food storage is its most important rule. While many backpackers are familiar with hanging a food bag (the “PCT method”), this technique is often impractical or impossible in the Yukon. Many of the most stunning landscapes, like those in Tombstone Territorial Park, are above the treeline. There are simply no trees tall or strong enough to execute a proper bear hang that keeps food safe from a determined grizzly.
Because of this environmental reality, hard-sided bear-proof canisters are not just a good idea—they are a legal requirement in many areas. As a case in point, Parks Canada mandates the use of approved bear-proof canisters in designated high-use and sensitive ecosystem zones of Kluane National Park and Tombstone Territorial Park. This regulation is a direct result of decades of human-wildlife conflicts. A canister is the only surefire way to ensure bears don’t get a food reward, protecting both you and the bears, who may have to be destroyed if they become habituated to human food.
You don’t necessarily need to buy one. Several locations in Whitehorse rent approved models like the BearVault BV500. It’s crucial to plan this rental in advance, especially during the peak summer season. Also, remember that you cannot fly with bear spray; you must purchase it upon arrival in Whitehorse. These logistical details are a key part of your trip planning. Using a canister is a clear action that demonstrates your respect for the wildlife and the rules of the land you’re visiting.
GPS Device vs. Paper Map: Which Is More Reliable in Dense Canopy?
The debate of digital vs. analog navigation is common among outdoor enthusiasts. In the Yukon, this is the wrong question. An expert approach doesn’t choose one over the other; it uses both within a robust framework of system redundancy. Relying on a single navigation tool, whether a GPS device or a paper map, creates a single point of failure that can have catastrophic consequences in this remote environment.
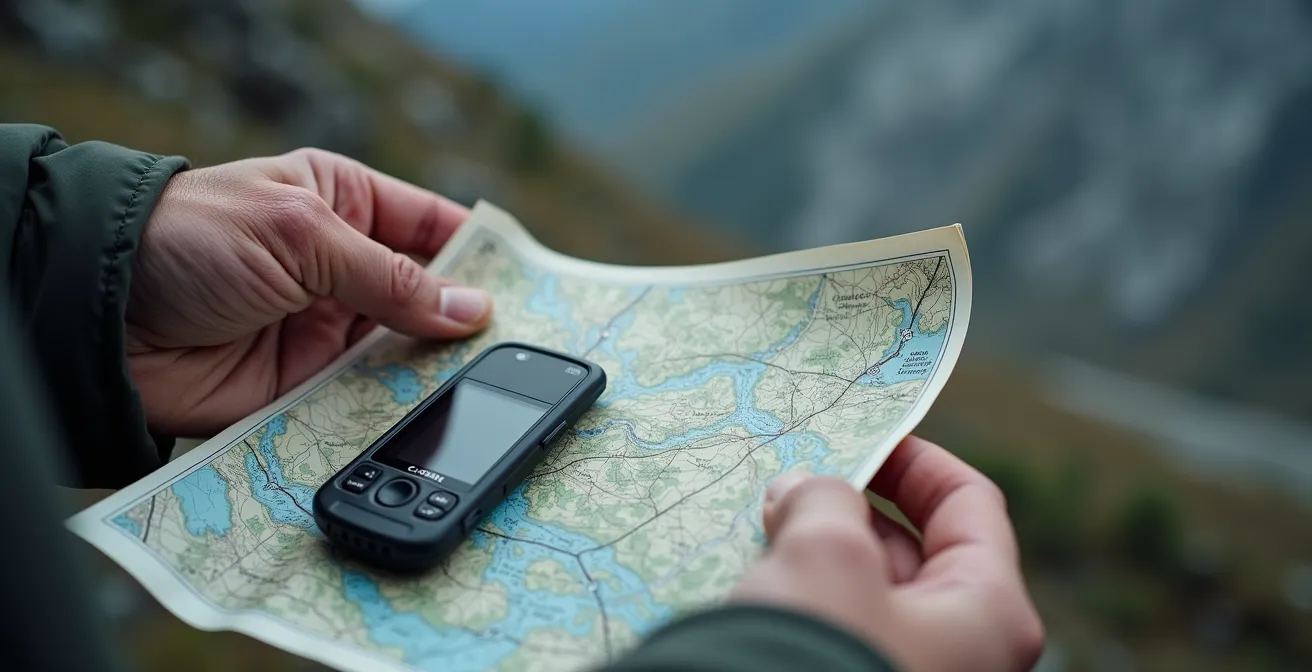
Your primary system should always be the most reliable: a laminated 1:50,000 topographic map and a properly calibrated compass. This system is waterproof, battery-free, and unaffected by electronic failure or the cold (provided your compass is appropriate for the latitude). Your secondary system should be a dedicated handheld GPS unit. These are more rugged and have better satellite reception in dense canopy or deep canyons than a smartphone. Critically, they should be powered with lithium batteries, which perform significantly better than alkaline in the extreme cold that can occur even in summer at high elevations.
Your tertiary system is your smartphone, equipped with an app like Gaia GPS with pre-downloaded offline maps. This is an excellent backup but should be treated as such. Phone batteries drain quickly in the cold and are more fragile. Keep it in a warm inside pocket to preserve its charge for a true emergency. All three components should be stored in double-layered waterproof protection, like a dry bag inside your pack liner. This triple-redundancy system ensures that if one tool fails, you always have a reliable backup to navigate your way to safety.
Key Takeaways
- Specialized Gear is Non-Negotiable: The Yukon’s unique environment, characterized by permafrost, tundra, and magnetic anomalies, makes standard backpacking gear insufficient and sometimes dangerous.
- Understand the “Why”: True preparedness comes from understanding why certain gear is required—from packing out waste in fragile tundra to using a compass built for northern magnetism.
- Ethical Distance is a Legal Requirement: Your responsibility as a visitor includes respecting wildlife by adhering to strict legal viewing distances, which directly informs your choice of equipment like camera lenses.
Wildlife Photography Ethics: How Close Can You Legally Get to Northern Fauna?
Photographing the Yukon’s iconic wildlife—grizzly bears, caribou, Dall sheep—is a highlight for many visitors. However, the pursuit of the “perfect shot” can lead to dangerous and unethical behaviour that puts both people and animals at risk. To protect wildlife and ensure public safety, there are strict legal requirements for viewing distances. It’s not a suggestion; it’s the law. In Canada’s National Parks, Parks Canada mandates that photographers maintain a minimum of 100 metres (about the length of a football field) from bears, wolves, and cougars, and 30 metres from all other large mammals like moose, caribou, and sheep.
These distances are based on animal behaviour science and are designed to prevent wildlife from feeling threatened or altering their natural activities. Getting too close can cause an animal extreme stress, force it to flee from a crucial food source, or even provoke a defensive attack. Even more insidiously, it can lead to habituation. This is a severe problem along Yukon highways, where “photographer bears” learn to associate vehicles and people with a lack of threat. These bears lose their natural fear of humans, often leading to them approaching cars for food. Tragically, a habituated bear is often a dead bear, as wildlife managers may be forced to relocate or destroy it when it becomes a public safety risk.
Your camera and lens choice are therefore not just a creative decision, but an ethical one. The concept of ethical distance means you must have the right equipment to get a compelling image while respecting these legal and moral boundaries. It is your responsibility to know the rules and to have gear that allows you to follow them. A desire for a close-up photo never justifies endangering an animal’s life.
Telephoto Necessity: Why You Need at least 400mm for Safe Wildlife Shots?
Now that you understand the legal requirement to stay 100 metres from a grizzly bear, the practical challenge becomes clear: how do you get a decent photograph from that distance? The answer lies in your lens. A standard zoom lens (like a 70-200mm) is simply not powerful enough. At 100 metres, a grizzly bear will appear as a small dot in your frame, resulting in a disappointing photo that fails to capture the majesty of the animal. This is where a telephoto lens becomes an essential piece of safety and photography gear.
To get a frame-filling, detailed shot of a large animal from a safe and legal distance, you generally need a lens with a focal length of at least 400mm. A 600mm lens is even better, especially for smaller or more distant subjects like Dall sheep on a mountain ridge. This isn’t about being a professional photographer; it’s about having the right tool to act ethically. A long lens allows you to give wildlife the space it needs and deserves, preventing stress and habituation while still allowing you to capture powerful images.
Bringing a large, expensive lens to the backcountry can seem daunting, but there are practical solutions. Several camera stores in major Canadian cities like Calgary and Vancouver offer weekly rentals for telephoto lenses and can even ship them to your hotel in Whitehorse. This is a cost-effective way to ensure you have the right equipment for your trip. This table illustrates how different focal lengths perform at legal viewing distances, making the case for a long lens crystal clear.
| Subject | Legal Distance | 70-200mm Result | 400mm Result | 600mm Result |
|---|---|---|---|---|
| Grizzly Bear | 100m minimum | Small dot in frame | Identifiable but small | Frame-filling shot |
| Caribou | 30m minimum | Full body visible | Good detail shot | Close portrait possible |
| Dall Sheep on ridge | Often 200m+ | Barely visible | Small in frame | Usable image |
| Arctic Fox | 30m minimum | Very small | Good size | Excellent detail |
Your Yukon adventure begins with preparation. Use this guide to audit your gear, understand the ‘why’ behind each item, and travel with the confidence that comes from being truly prepared for the magnificent challenges of the North.