
In summary:
- Success in the Rockies depends less on the “spot” and more on mastering the unique light of northern latitudes.
- Conveying the immense scale of the mountains requires specific framing techniques and often a telephoto lens, not just a wide-angle.
- Technical proficiency in editing snow and understanding strict local regulations (like drone bans) is non-negotiable.
- Overcast days can produce more saturated colours for subjects like autumn leaves than the classic golden hour.
Every photographer who visits the Canadian Rockies feels it: that mix of pure awe and daunting challenge. You stand before giants like Mount Rundle or the Ten Peaks, camera in hand, trying to translate an overwhelming spectacle into a single, powerful frame. The internet is full of advice pointing you to the holy trinity of Moraine Lake, Lake Louise, and Vermilion Lakes. And yes, they are breathtaking. But showing up at the right spot is only 10% of the battle.
Most guides talk about gear and locations, but they miss the most crucial elements unique to our Albertan backyard. They don’t explain the physics of our light, the visual language of our scale, or the hard-won local knowledge that turns a good snapshot into a gallery-worthy piece. The real secret to capturing the Rockies isn’t about finding a new location, but about seeing the iconic ones with a deeper understanding of the environment itself. It’s about knowing *why* our blue hour lingers, how to use atmospheric haze to your advantage, and why a telephoto lens can be more powerful than a wide-angle for showing true mountain scale.
This guide goes beyond the “what” and dives into the “how” and “why.” We’ll deconstruct the specific qualities of light in our northern latitudes, explore advanced composition techniques to convey immense scale, and tackle the practical realities of gear choice, editing for our unique conditions, and navigating the strict rules of our national parks. Forget the postcard clichés; let’s create images with intention and impact.
For those looking for a hands-on tutorial, the following video offers a fantastic walkthrough of editing golden hour photos in Lightroom, a perfect complement to the on-location advice in this guide.
To help you navigate these advanced concepts, this article is structured to build your expertise progressively. You’ll find a detailed breakdown of each critical aspect of Rockies photography, from understanding light to respecting wildlife.
Summary : A Photographer’s Deep Dive into Mastering the Canadian Rockies
- Why Is the “Blue Hour” Longer in Northern Canada Than in the Tropics?
- How to Frame Massive Mountains to Show Scale in Your Photos?
- Wide-Angle Lens vs. Telephoto: Which is Essential for Banff National Park?
- The Drone Fine Risk: Where Can You Legally Fly in Canadian Parks?
- Editing Snow Photos: How to Fix Grey Snow Without Blowing Out Highlights?
- How to Find High Ground in a Flat Province for Photography?
- Golden Hour vs. Overcast: Which Light Makes Red Leaves Pop More?
- Banff or Jasper: Which National Park Is Better for Wildlife Viewing?
Why Is the “Blue Hour” Longer in Northern Canada Than in the Tropics?
One of the first things photographers notice when shooting in the Rockies is how the light behaves differently. The “blue hour,” that magical period of twilight before sunrise or after sunset, feels drawn out, almost luxuriously long compared to equatorial regions. This isn’t just a feeling; it’s physics. Because of Earth’s tilt, the sun rises and sets at a much shallower angle at northern latitudes like Banff. This means it spends more time just below the horizon, extending the period where its light scatters through the upper atmosphere, creating those deep, saturated blues.
In practice, this extended timeline is a massive creative gift. While photographers in the tropics might have a frantic 6-8 minute window, it’s not uncommon for the usable blue hour in Banff to last over 13 minutes, even in winter. This gives you more time to refine compositions, bracket exposures, and experiment with different focal lengths. Instead of a mad dash, it becomes a deliberate, creative process. You can capture the first alpenglow hitting the peaks while the valleys are still bathed in cool, blue light, creating incredible colour contrast within a single frame.
To make the most of this extended window, a few strategies are key:
- Arrive at least 20 minutes before the official sunrise, as clouds often begin reflecting beautiful colours well before the sun crests the horizon.
- Trust your camera’s Auto White Balance initially, as the colour temperature changes dramatically and quickly. You can fine-tune it in post.
- Use Aperture Priority mode (Av) to let the camera manage the shutter speed as the light changes, allowing you to focus purely on composition.
- Plan your shots using an app like PhotoPills to know the exact timing of not just blue hour, but also the preceding “nautical twilight,” which can offer even deeper blues and the first visible stars.
How to Frame Massive Mountains to Show Scale in Your Photos?
The biggest challenge in mountain photography is conveying the sheer, mind-boggling scale of the landscape. A photo of a 3,000-metre peak can easily look flat and unimpressive without a reference point. The most common technique is to include a human element. Placing a person, a tent, or even one of the iconic red Parks Canada chairs in the foreground immediately gives the viewer’s brain a familiar object to measure the background against.
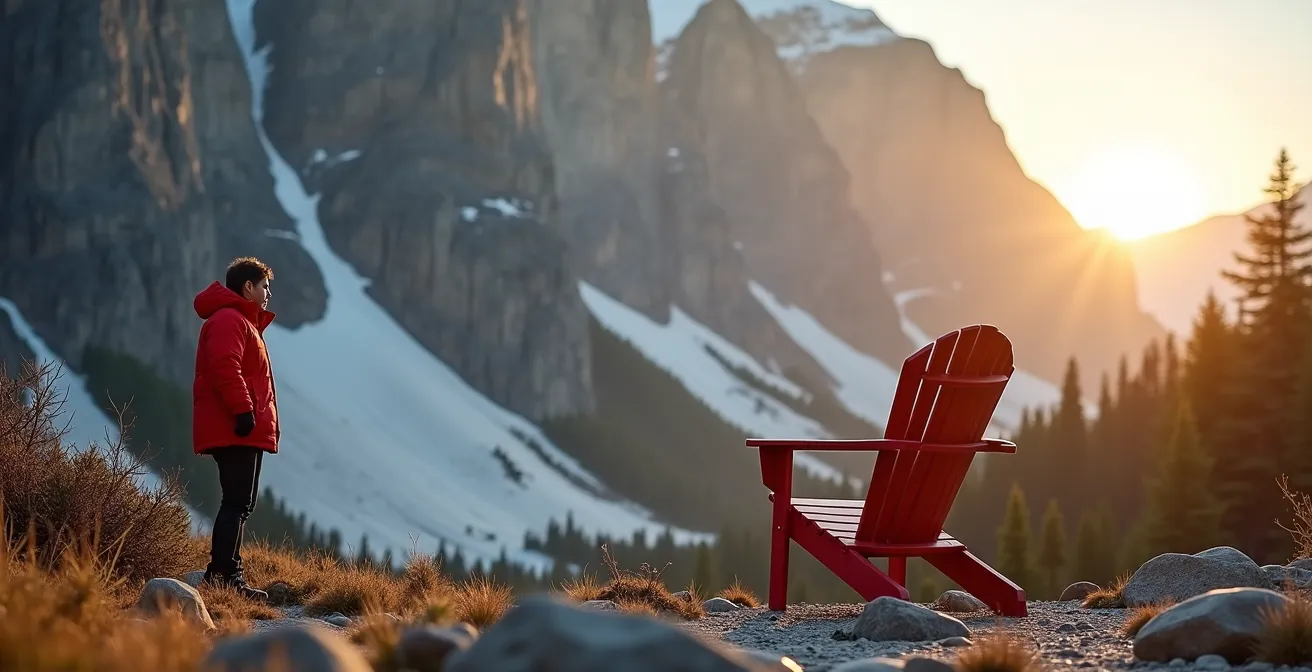
As you can see, the hiker in the bright red jacket becomes an anchor point. Their small size relative to the towering rock face of Mount Rundle tells a powerful story of human presence in a vast, wild world. But there are more subtle, and often more powerful, ways to demonstrate scale that go beyond just placing a person in the shot. One of the most effective techniques used by professional landscape photographers is leveraging atmospheric perspective.
Case Study: Using Atmospheric Haze on the Icefields Parkway
Driving the Icefields Parkway, you’ll notice that each successive mountain range appears lighter, bluer, and less detailed than the one in front of it. This is due to atmospheric haze—tiny particles of dust and moisture in the air that scatter light. Instead of fighting it, photographers embrace it. By composing a shot with multiple overlapping ranges, this natural layering effect creates an incredible sense of depth and distance. The mountains themselves become the scale reference for each other. This is especially potent in the hours after sunrise, when the golden hour light is blocked by the tall peaks, forcing you to work with diffuse light that enhances these layered, atmospheric effects.
Wide-Angle Lens vs. Telephoto: Which is Essential for Banff National Park?
The classic advice for landscape photography is to “go wide.” A wide-angle lens (typically 16-35mm) is fantastic for capturing sweeping vistas, dramatic reflections on still lakes, and getting close to interesting foreground elements like cracked ice or wildflowers. In Banff, a wide-angle is indispensable for iconic shots like the full view from the Moraine Lake Rockpile or the shoreline of Lake Louise. It allows you to drink in the entire scene. As renowned photographer Brendan van Son notes about his favourite sunrise spot:
My favourite place on the planet to watch the sunrise is Moraine Lake. 10mm: f/9, 20sec., ISO100
– Brendan van Son, Canadian Rockies Photography Tour
However, relying solely on a wide-angle lens is one of the biggest mistakes photographers make in the Rockies. A telephoto lens (70-200mm or longer) is not just for wildlife; it’s a crucial tool for landscape work here. It allows you to isolate compelling details—the texture of a distant glacier, the light hitting a single peak, or abstract patterns in the rock. More importantly, it lets you use a technique called “lens compression,” which makes distant objects appear closer together. This is incredibly powerful for stacking mountain ranges on top of each other, creating a sense of density and overwhelming scale that a wide-angle can’t achieve.
The choice isn’t about which lens is “better,” but which lens tells the story you want to tell. Here is a breakdown of how to decide:
| Lens Type | Best Locations | Key Advantages | Ideal Subjects |
|---|---|---|---|
| Wide-Angle (10-35mm) | Moraine Lake Rockpile, Lake Louise shoreline, Johnston Canyon | Captures full mountain reflections, dramatic leading lines with ice patterns | Full valley views, close foreground elements, starry skies |
| Telephoto (70-200mm+) | Vermillion Lakes for Mount Rundle, Peyto Lake overlook | Compresses mountain layers, isolates wildlife safely, captures peak details | Distant glaciers, wildlife, abstract rock patterns, compressed perspectives |
| Hybrid Approach | Bow Lake panoramas, Valley of Ten Peaks | Multi-image panorama with telephoto gives wide view plus high detail | Large-scale prints, maximum resolution landscapes |
The Drone Fine Risk: Where Can You Legally Fly in Canadian Parks?
The temptation is immense: you’re standing at a breathtaking overlook, and the thought of launching a drone to get that epic, sweeping aerial shot is almost overwhelming. But before you even think about unpacking your drone in Banff, Jasper, Yoho, or any Canadian National Park, you need to know one critical piece of information: it is strictly illegal. This isn’t a minor rule; it’s a serious regulation enforced to protect both the fragile wildlife and the wilderness experience for all visitors.
The consequences of ignoring this ban are severe. Parks Canada is vigilant, and fellow visitors are quick to report illegal drone activity. The penalties are not just a slap on the wrist. According to photography tour operators in the region, the maximum fine for flying a drone in a Canadian National Park can be up to $25,000 CAD. That’s a risk no shot is worth. The reasoning is sound: drones can cause significant stress to wildlife, from nesting birds to grizzly bears, and the noise shatters the sense of peace that people come to the parks to find.
So, what are your options if you want those stunning aerials? The key is to know where the park boundaries end. Just outside the national parks, there are vast areas with equally stunning scenery where drone flight is permitted, provided you follow Transport Canada regulations. Kananaskis Country, to the southeast of Banff, offers incredible mountain landscapes and allows drone use with the proper permits. Similarly, public lands around Canmore and the stunning Abraham Lake area are popular, legal alternatives for drone photographers. Just remember that even in these areas, you still need the appropriate Basic or Advanced Operations Certificate from Transport Canada, especially if flying near people or roads.
Editing Snow Photos: How to Fix Grey Snow Without Blowing Out Highlights?
Photographing the Rockies in winter is a dream, but it comes with a common post-processing nightmare: grey, muddy-looking snow. Our cameras’ light meters are calibrated for a “middle grey” scene. When a frame is dominated by bright white snow, the camera gets fooled and underexposes the shot to compensate, resulting in a dull, grey image. The simple fix is to increase the exposure in post-production, but this often leads to a new problem: “blowing out” the highlights, where the brightest parts of the snow lose all detail and become pure white blobs.
The key to perfect, bright-but-detailed snow lies in a nuanced approach in a program like Adobe Lightroom. It’s a delicate dance between setting the correct white balance, managing global exposure, and then finessing the highlights and whites. You want the snow to read as white, but still retain the subtle textures and shadows that give it shape and dimension. A common mistake is also to completely neutralize the blue tones in shaded snow. While it’s important to correct the overall colour cast, leaving a hint of blue in the shadows can enhance the feeling of a cold, crisp winter day, adding to the atmosphere of the image.
After years of editing winter scenes from the Rockies, I’ve developed a consistent workflow to tackle this challenge. It allows for precise control to get that perfect balance of brightness and detail.
My 6-Step Workflow for Perfect Snow
- Neutralize the Cast: Use the White Balance eyedropper tool on a patch of snow that’s in the shade (not direct sun). This will neutralize the strong blue cast from the sky’s reflection and provide a clean starting point.
- Set the White Point Precisely: Hold the Alt/Option key while dragging the “Whites” slider to the right. The screen will turn black. Stop just before you see white “clipping” appear. This sets your white point without losing highlight detail.
- Refine Highlights: Repeat the Alt/Option key process with the “Highlights” slider, pulling it back to the left if necessary to recover any subtle texture in the brightest areas.
- Soften Harsh Texture: For scenes with wind-blown, harsh snow, applying a small amount of negative Dehaze (-10 to -20) can magically soften the texture and reduce micro-contrast.
- Add Punch to Flat Light: Conversely, for flat, overcast snow days, a touch of positive Dehaze (+5 to +10) can add needed contrast and dimension.
- Warm the Peaks: To enhance the golden hour glow on distant peaks without affecting the snow, use a Graduated Filter. Drag it down from the top and apply a slight temperature increase (+5 to +10) only to the mountains.
How to Find High Ground in a Flat Province for Photography?
While the Rockies get all the attention, some of Canada’s most compelling skies and subtle landscapes are found in the prairies of Saskatchewan and Manitoba. For a photographer accustomed to mountain vistas, the biggest creative challenge is the lack of obvious elevation. How do you get a vantage point to capture a sweeping sunset or a dramatic storm cloud when the highest point for miles is a fence post? The answer lies in redefining what “high ground” means and leveraging the man-made and natural features that break the flat horizon.
The prairies are not entirely flat. River valleys like the stunning Qu’Appelle Valley in Saskatchewan cut deep into the plains, creating natural overlooks and dramatic changes in elevation. Man-made structures also become essential tools. The iconic grain elevators that dot the landscape aren’t just rustic subjects; they are vertical landmarks that can be used as compositional anchors or, if you can find a safe, accessible one, a high perch. Bridges and highway overpasses are also invaluable, offering unobstructed, elevated views of the horizon that are perfect for sunrise or sunset compositions.
Case Study: Finding Elevation in Saskatchewan
Photographers in Saskatchewan prove that “flat” is a state of mind. They make pilgrimages to the Cypress Hills, a unique forested plateau that straddles the Alberta-Saskatchewan border and is, remarkably, the highest point of land in Canada between the Rockies and Labrador, reaching an elevation of 1,468m. In flatter regions, they focus on the “big sky,” where the clouds become the main subject and the land is just a sliver of context. In cities like Saskatoon, photographers use the bridges over the South Saskatchewan River to gain perspective and capture the city skyline against the vast prairie sky.
Ultimately, photography in a flat province forces a shift in focus. Instead of relying on grand topography, you learn to see the power in minimalism, the drama in the sky, and the beauty of isolated subjects like a lone tree or an abandoned barn against an endless horizon.
Golden Hour vs. Overcast: Which Light Makes Red Leaves Pop More?
When autumn arrives in Eastern Canada, photographers instinctively chase the golden hour, hoping to capture the fiery red and orange maple leaves backlit by a warm, low sun. This can create beautiful, glowing results and dramatic long shadows. However, one of the best-kept secrets of fall foliage photography is that a bright, overcast day will often produce far more intense and saturated colours than direct sunlight.
The reason is simple: an overcast sky acts like a giant, perfectly diffused softbox. It eliminates the harsh, specular highlights (the shiny, washed-out spots) that you get on leaves in direct sun. Without these distracting highlights, the true, deep pigment of the leaf is revealed. This even, soft light allows your camera sensor to capture the full, rich range of reds, oranges, and yellows without clipping the highlights or crushing the shadows. Adding a circular polarizer can further enhance this effect by cutting through any remaining glare on the leaf surfaces, especially after a recent rain.
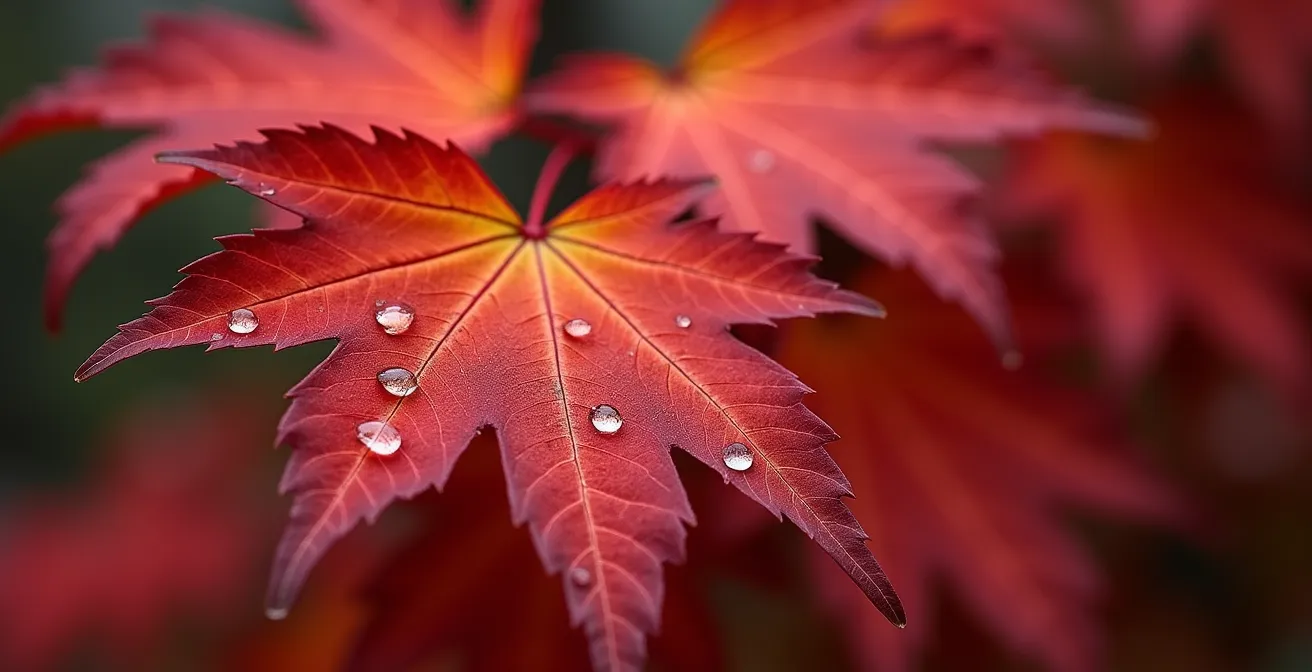
As this close-up shows, the soft, diffused light saturates the red of the maple leaf and brings out the intricate detail of its veins and the tiny water droplets on its surface. This level of colour fidelity is almost impossible to achieve in the harsh contrast of direct golden hour light. The best light of all can be that magical, fleeting moment when the golden sun breaks through the clouds right after a rain shower, backlighting the wet, saturated leaves against a dark, stormy sky.
Both lighting conditions offer unique advantages, and the best choice depends on the mood you want to create.
| Light Type | Advantages | Best Techniques | Canadian Locations |
|---|---|---|---|
| Overcast | Acts as giant softbox, reduces specular highlights, deeply saturates colors | Use circular polarizer to cut leaf glare, shoot after rain for maximum saturation | Algonquin Park maples, Quebec Laurentians |
| Golden Hour | Creates beautiful backlighting, warm color cast, dramatic shadows | Position for rim lighting, use lens flares creatively, capture sun through leaves | Ontario cottage country, Eastern Townships |
| Best of Both | Golden sun breaking through after overcast rain creates glowing backlit leaves against dark clouds | Quick positioning to catch fleeting light, expose for highlights | Maritime provinces during autumn storms |
Key takeaways
- The quality and duration of light in the Rockies are fundamentally different due to northern latitudes; master the extended blue hour for unique shots.
- A telephoto lens is as crucial as a wide-angle for landscape work, allowing you to compress mountain layers and isolate powerful details.
- Respect for local regulations is paramount; flying a drone in a National Park carries a fine of up to $25,000 and harms the environment you’re there to capture.
Banff or Jasper: Which National Park Is Better for Wildlife Viewing?
For many photographers visiting the Rockies, capturing an image of the iconic wildlife is as important as the landscapes. The two largest parks, Banff and Jasper, both offer incredible opportunities, but they have distinct characters and are better for different species. Choosing where to focus your time can significantly increase your chances of a successful and ethical wildlife encounter.
Banff, being more developed and accessible, offers very reliable sightings of bighorn sheep, often right along the Lake Minnewanka loop, and large herds of elk are frequently seen near the Banff townsite itself. The Bow Valley Parkway is a prime corridor for wildlife, especially in the early morning. Jasper, on the other hand, feels wilder and more remote. It’s famous for its huge elk herds (which are so comfortable they often wander right through the town) and is generally considered a better bet for seeing black bears, especially along the Maligne Lake Road in the spring. Jasper also holds the faint, precious hope of spotting the elusive woodland caribou, a species struggling for survival.
Ultimately, the “better” park depends on your target species and your tolerance for crowds. For all wildlife photography, the ethical considerations are paramount. As the experts at Astralis Photography wisely advise:
Photographing the elk rut is an exercise in patience and respect for wildlife; it requires keeping a safe distance, using long lenses, and often waiting silently for hours
– Astralis Photography, Canadian Rockies Autumn Workshop
This table provides a quick reference for planning your wildlife photography trip:
| National Park | Best Wildlife | Peak Viewing Times | Hotspot Locations |
|---|---|---|---|
| Banff | Bighorn Sheep (reliable), Elk near townsite, Black Bears | Early morning along Bow Valley Parkway | Lake Minnewanka loop, Bow Valley Parkway, Vermillion Lakes |
| Jasper | Large Elk herds (often in town), Black Bears, rare Caribou chance | Fall rutting season (September-October) | Maligne Lake Road, Celestine Lake Road, town of Jasper |
| Shared Areas | Bears foraging in spring, Mountain Goats | Spring (May-June) for bears in valleys | Icefields Parkway valley bottoms |
With this deeper understanding of light, composition, and local knowledge, you are now equipped to move beyond simple sightseeing and start creating truly compelling images of the Canadian Rockies. Plan your next photographic adventure with these principles in mind to transform your vision into unforgettable art.
Frequently Asked Questions on Capturing the Rockies: The 3 Best Spots for Golden Hour Photography
Can I fly a drone in Banff National Park?
No, drones are completely banned in all Canadian National Parks including Banff, Jasper, Yoho and Kootenay. This ban is enforced to protect wildlife and preserve visitor experience.
What are the legal alternatives near Banff?
Kananaskis Country allows drone flying with proper permits. Areas around Canmore and Abraham Lake are also drone-friendly zones with comparable mountain scenery.
Do I need a certificate to fly near populated areas?
Yes, Transport Canada requires either Basic or Advanced operations certificates for flying near populated areas like Canmore or Banff townsite.