In summary:
- Choose high-ankle boots with a secure lacing system to prevent them from being sucked off in deep mud.
- Cross beaver dams by distributing weight on the strongest logs and never damaging the structure.
- Always filter wetland water, no matter how clear, due to the high risk of Giardia from animal waste.
- Prepare for peak bug season in June and July with repellents, nets, and appropriate clothing.
- Master basic mud-sculling and bracing paddle strokes for navigating shallow, vegetation-choked channels.
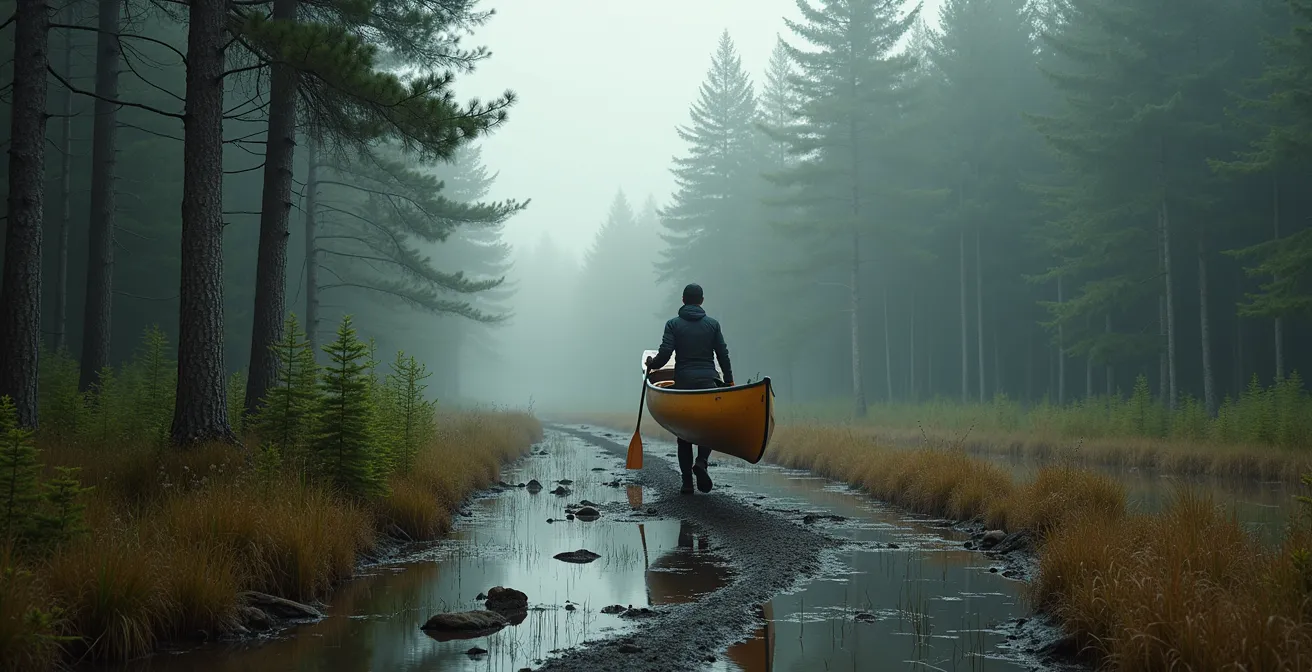
The smell of wet earth, the hum of mosquitos, and the sight of a portage sign half-submerged in a beaver pond. If you’ve paddled the Algonquin interior, you know this scene. For new paddlers, that stretch of dark, sucking mud between you and the next lake can be the most intimidating part of the entire trip. The fear is real: losing a boot, twisting an ankle, or sinking your canoe up to the gunwales. Many guides will tell you to just “be careful” or “wear waterproof boots,” but that advice falls short when you’re knee-deep in the Canadian Shield’s signature muck.
The truth is, crossing these wetlands isn’t about avoiding the mud; it’s about learning the grammar of the swamp. It’s about understanding how to work *with* the suction, how to read the subtle signs in the terrain, and how to use techniques passed down from the voyageurs who navigated these same waterways centuries ago. Forget brute strength. Success here is about finesse, knowledge, and respect for the environment you’re moving through. This isn’t just a physical challenge; it’s a test of your backcountry skills, from gear selection and sanitation to the very way you hold your paddle.
This guide will walk you through the time-tested strategies for conquering those muddy crossings. We’ll go beyond the obvious and dive into the specific gear, techniques, and ecological knowledge you need to move through Algonquin’s wetlands with the confidence of a seasoned guide, ensuring your trip is memorable for its beauty, not for a lost shoe.
Summary: Algonquin Canoe Routes: Portaging Tips for Muddy Wetland Crossings
- Amphibious Shoes vs. Boots: Which Won’t Get Sucked Off in Mud?
- The Beaver Dam Hop: How to Cross Without Breaking the Structure?
- Giardia Risk: Why You Must Filter Even Clear Wetland Water?
- Mosquito Season: When Is the Bug Pressure Highest in Wetlands?
- Nature’s Kidneys: Why Are Wetlands Critical for Water Purity?
- How to Poop in the Woods: The Leave No Trace Guide for Tundra Environments
- Canoe vs. Kayak: Which Is Harder to Roll in Whitewater?
- Whitewater Canoeing: How to Master the J-Stroke for Class III Rapids?
Amphibious Shoes vs. Boots: Which Won’t Get Sucked Off in Mud?
I’ve seen it a hundred times: a paddler takes one step into a boggy portage, and the mud creates a vacuum, pulling their loose-fitting water shoe right off their foot. Now they’re balancing on one leg, arm-deep in brown water, trying to fish out a lost shoe. This is the single most common gear failure in Algonquin’s wetlands. The solution isn’t just “waterproof”; it’s about mechanical grip and fit. Standard amphibious shoes or low-cut hikers are simply not up to the task.
Your best defense is a high-ankle boot with a robust lacing system. Think of options like the classic L.L.Bean Maine Hunting Boot or the NRS Boundary Boot. The height prevents mud and water from pouring over the top, while the laces allow you to lock your heel into the back of the boot, eliminating the internal slippage that leads to suction loss. Pairing them with neoprene or thick wool socks adds friction and a wetsuit-like effect, keeping your feet functional even when wet. Experienced paddlers in the Shield often use a two-system approach: a lighter, quick-draining boot for summer and a fully waterproof, knee-high system for the cold, wet conditions of spring.
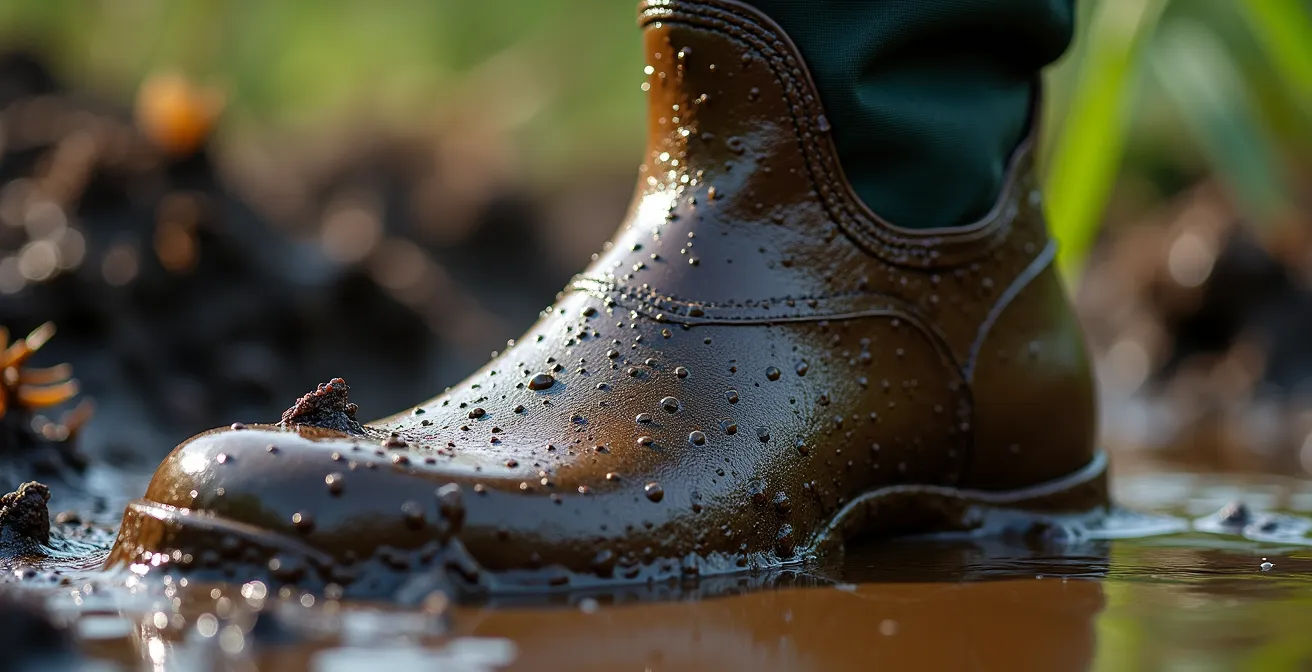
The key is creating a sealed system from your foot to your calf. The boot must become an extension of your leg, not just a covering for your foot. This is how you defeat the suction monster that lives in every Algonquin swamp. Before you commit to a deep crossing, test your setup in the shallows. A minute of preparation at the water’s edge can save you an hour of misery on the trail.
Action Plan: Locking Your Boots for a Mud Portage
- Choose ankle-high boots with a secure lacing system like LL Bean Maine Hunting Boots or NRS Boundary Boots for maximum mud resistance.
- Wear neoprene or wool socks underneath to create friction and prevent foot slippage inside the boot.
- Use a heel-lock lacing technique by creating loops at the top two eyelets and crossing laces through them.
- Add gaiters that attach to boot laces and secure with velcro above the calf to create a sealed system.
- Test your setup by stepping in shallow mud at camp before attempting deep portage crossings.
The Beaver Dam Hop: How to Cross Without Breaking the Structure?
That beaver dam might look like a convenient bridge, but it’s also a vital piece of ecosystem engineering and private property. Messing with it is not only disrespectful to the animal that built it, but it’s also illegal. In fact, Ontario has issued significant penalties for such actions; in one case, three North Bay men were fined a total of $3,000 for damaging beaver dams. Your goal is to cross it like a ghost, leaving no trace of your passage. This requires technique, not just force.
The first rule is to distribute your weight. Never jump. Step deliberately onto the largest, most solid-looking logs. Avoid the fresh, gooey-looking sections of mud and sticks, as these are the weakest points. If you’re in a tandem canoe, this is a team effort. Unload your heaviest gear first. Then, with one person on each side of the canoe, lift and pass it over the dam, always communicating. A solo paddler has a tougher job, often requiring a pivot-and-drag technique, using their paddle as a third point of contact for stability. Test every footstep before committing your full weight.
This process of evaluating solo versus tandem techniques highlights the importance of teamwork and planning when facing these natural obstacles. The method you choose depends heavily on your crew and gear load.
| Method | Solo Paddler | Tandem Team | Weight Distribution |
|---|---|---|---|
| Canoe Handling | Pivot and drag technique using paddle as brace | One person on each side lift | Keep weight centered on strongest dam logs |
| Gear Management | Multiple trips required | Can pass gear between partners | Unload heaviest items first |
| Dam Contact Points | Test each step before committing weight | Spread weight across multiple points | Avoid fresh mud-and-stick sections |
| Safety Priority | Never rush – stability over speed | Communicate constantly during lift | Watch for underwater hazards |
Giardia Risk: Why You Must Filter Even Clear Wetland Water?
The water in an Algonquin wetland can look deceptively pure. It might be clear, cold, and flowing. But that water is part of a living system, and it’s almost certainly contaminated. The primary culprit is *Giardia lamblia*, a microscopic parasite that causes a nasty intestinal illness often called “beaver fever.” Beavers, muskrats, and other mammals that live in and around these wetlands are common carriers, shedding Giardia cysts into the water through their waste.
These cysts are hardy and can survive for months in cold water. In Algonquin Park, with its vast 7,630 square kilometres of interconnected waterways, the risk is everywhere. The water here is also rich in tannins—natural organic compounds from decomposing vegetation that give it a tea-like color. While harmless, these tannins can rapidly clog certain types of water filters, particularly ceramic models. Hollow-fiber filters, like the popular Sawyer Squeeze, tend to perform better in these conditions. However, no filter is foolproof.
Because the concentration of cysts is highest in the slow-moving water of beaver ponds and wetlands, a two-stage approach is the gold standard for safety in the Canadian Shield. First, use a mechanical filter to remove cysts and sediment. Second, treat the filtered water with chemical tablets (like chlorine or iodine) or a UV sterilizer to kill any viruses or bacteria that may have passed through. It may seem like overkill, but a bout of Giardia can end a trip and leave you with health issues for weeks. Never take the risk.
Mosquito Season: When Is the Bug Pressure Highest in Wetlands?
If wetlands are the heart of Algonquin, then biting insects are its lifeblood. And their pressure is not constant; it ebbs and flows with the seasons, time of day, and specific location. The undisputed heavyweight champions of misery are the mosquitoes and black flies. Wetlands are their breeding grounds, and if you’re portaging through one at the wrong time, the experience can be brutal. Backcountry guides agree that for mosquitoes, the peak season is clear: according to backcountry camping guides, June has the highest mosquito populations, with black flies peaking from late May through June.
The pressure is most intense at dawn and dusk, when the air is still and humid. A slight breeze or the smoke from a campfire can provide a welcome reprieve. Your defense is a multi-layered system: a good repellent containing DEET or Icaridin, a bug jacket or head net with fine mesh, and light-colored, loose-fitting clothing that covers your skin. As summer progresses, the mosquitoes give way to deer and horse flies, which are most active on hot, sunny afternoons. By late summer, the tiny, infuriating no-see-ums emerge in the evenings.
Knowing your enemy is half the battle. This calendar helps you anticipate what you’ll be up against, allowing you to pack the right defenses and mentally prepare for the inevitable buggy encounters.
| Insect Type | Peak Season | Worst Conditions | Best Defense |
|---|---|---|---|
| Black Flies | Late May – June | Calm, humid mornings | Head nets, light colors |
| Mosquitoes | June – July | Dawn and dusk in wetlands | DEET or Icaridin repellents |
| Deer/Horse Flies | July – August | Hot sunny afternoons | Bug jackets, quick movement |
| No-see-ums | August – September | Still evenings near water | Fine mesh netting |
Nature’s Kidneys: Why Are Wetlands Critical for Water Purity?
That swampy portage you’re dreading is more than just an obstacle; it’s a vital organ of the wilderness. Wetlands function as the kidneys of the landscape, performing essential filtration that maintains the health of the entire watershed. As water flows through them, the dense vegetation slows it down, causing sediment and pollutants to drop out of suspension. The microorganisms in the soil and on plant roots then get to work, breaking down nutrients and contaminants. Beavers, often seen as nuisances, are key partners in this, as their dams create ponds that are incredibly effective at trapping sediment and improving water quality.
This natural filtration system is delicate. As paddlers, we have a responsibility to protect it. The most significant threat we can introduce is invasive species. A single plant fragment or microscopic organism carried on a boot or in the bilge water of a canoe can wreak havoc on a new lake, outcompeting native species and disrupting the entire food web. This is why protocols like the Clean, Drain, Dry program are so critical. It’s a simple but powerful mantra promoted by conservation authorities like the North Bay-Mattawa Conservation Authority.
Before moving between different watersheds, you must thoroughly clean all mud and vegetation from your boat, gear, and footwear. Drain every drop of water from your canoe and equipment. And ideally, allow everything to dry completely for at least five days. When you’re on a continuous trip, cleaning and draining between lakes is the most practical step. By doing this, you’re not just following a rule; you’re actively participating in the preservation of Algonquin’s pristine water quality for generations to come.
How to Poop in the Woods: The Leave No Trace Guide for Tundra Environments
This may seem like an odd topic in a guide about mud, but it’s fundamentally connected to wetland travel. Proper waste disposal is a cornerstone of Leave No Trace ethics, and the rules change dramatically when you’re in an environment with a high water table like a swamp or bog. The standard backcountry practice of digging a 6-8 inch cathole simply does not work in a wetland. You’ll hit water almost immediately, and waste will not decompose properly in the acidic, low-oxygen peat soils. Instead, it leaches directly into the water system you and others rely on for drinking.
This is why Ontario Parks has strict backcountry sanitation regulations, as outlined in the Provincial Parks and Conservation Reserves Act. In designated backcountry sites, you must use the provided privies (often called “thunderboxes”). They are strategically placed in areas with better soil drainage to manage waste safely. Where a privy is not available, and you are in a sensitive wetland zone, the gold standard is to pack it out. This means using a pack-out system like a WAG bag or another designated human waste disposal kit.
It’s not the most glamorous part of canoe tripping, but it’s one of the most important. Failing to manage waste correctly in these sensitive areas directly contributes to the contamination we discussed earlier, increasing the risk of waterborne illnesses for everyone. Respecting the environment means leaving absolutely nothing behind, and in a wetland, that principle is more critical than anywhere else.
Canoe vs. Kayak: Which Is Harder to Roll in Whitewater?
While the title talks about rolling in whitewater, the real question for an Algonquin paddler is about stability and practicality in a wetland environment. And in that context, the canoe is the undisputed king. A kayak might be sleek on open water, but it becomes incredibly awkward when you have to get in and out of it on a muddy, uneven shoreline. The seated entry forces you to put your feet and gear directly into the muck. The limited storage, confined to hatches, makes portaging a logistical puzzle.
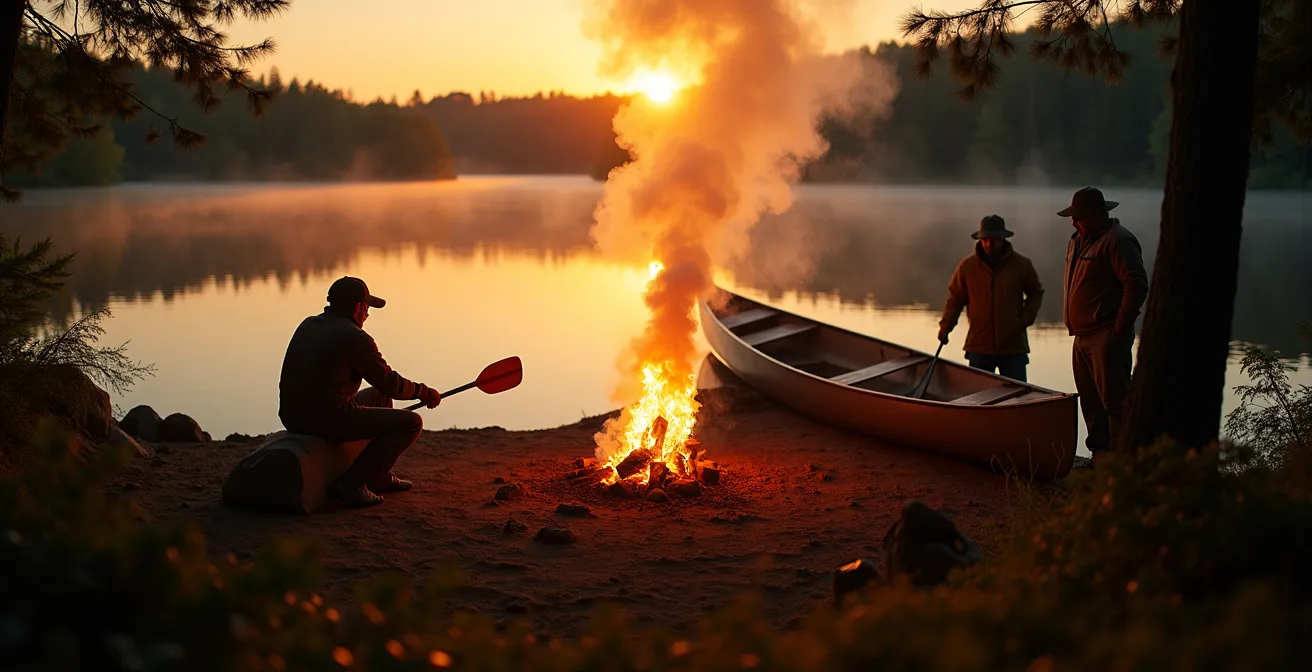
The canoe, with its open-hull design and wide beam, is perfectly suited for these challenges. You can step into it from the shore while it’s floating, keeping your feet relatively clean. It’s far easier for a partner to stabilize. Most importantly, its superior gear capacity—easily fitting 60-litre barrels and large packs—is essential for multi-day trips. The traditional overhead yoke carry is a time-tested, efficient way to transport the boat, something that’s nearly impossible with a kayak. As one dedicated kayak camper noted after extensive trips in the park, many paddlers eventually switch to canoes specifically because of the demands of portage-heavy routes.
The stability advantage of a canoe is clear when dealing with the unstable entry and exit points of a wetland portage. The ability to use the gunwales for bracing provides more options for maintaining balance.
This table, based on practical advice from Canadian paddling outfitters, breaks down why the canoe is the superior choice for wetland tripping.
| Factor | Canoe | Kayak | Advantage for Wetlands |
|---|---|---|---|
| Entry from muddy shore | Wide beam allows standing entry | Requires sitting entry in mud | Canoe – cleaner entry |
| Gear capacity | 60-80L barrels plus packs | Limited to hatches | Canoe – essential for portaging |
| Portage carrying | Traditional overhead carry | Awkward shoulder carry | Canoe – proven technique |
| Paddle brace options | Can brace paddle on gunwales | Limited bracing points | Canoe – more stability options |
| Partner assistance | Easy to hold for partner entry | Difficult to stabilize | Canoe – teamwork friendly |
Key Takeaways
- Wetland navigation is a skill based on knowledge and finesse, not just endurance.
- Your gear choices, especially footwear and water treatment, are your first line of defense against the most common trip-ending problems.
- Minimal impact is the goal; this includes everything from how you cross a beaver dam to how you manage your waste.
Whitewater Canoeing: How to Master the J-Stroke for Class III Rapids?
The J-stroke is the foundation of efficient canoe travel on open water, but when you enter a shallow, vegetation-choked wetland channel, its deep, corrective “J” becomes ineffective or impossible. Here, you must adapt your paddling, borrowing techniques from whitewater and traditional poling. Your paddle becomes less of an oar and more of a multi-tool for pushing, prying, and bracing.
When the water gets too shallow for a full stroke, you switch to poling or sculling. Poling is straightforward: you use your paddle like a pole, pushing off the bottom to maintain momentum. But the real art is the mud-sculling technique, a method dating back to the voyageurs. It involves a continuous, figure-8 motion with the paddle blade near the surface, providing propulsion through thick mud and weeds without needing a deep catch. This allows you to ghost through areas that would stop a less experienced paddler cold.
In narrow, winding channels, the whitewater paddler’s arsenal becomes invaluable. The pry stroke and the draw stroke allow you to make sharp turns and move the canoe sideways to avoid obstacles without needing forward momentum. A low brace, holding the paddle horizontally just above the water, becomes a critical tool for maintaining stability when you’re pushing through a thick patch of lily pads or hit an unseen log. Mastering these subtle, powerful strokes is the final piece of the puzzle, turning you from a passenger into the master of your vessel in any conditions.
Now that you’re equipped with the knowledge to read the terrain, choose the right gear, and handle your craft, you can approach any Algonquin wetland not with fear, but with respect and confidence. The next step is to get out there and put it into practice, turning these concepts into muscle memory.