In summary:
- Verify every operator’s TSSA (Technical Standards and Safety Authority) permit, which is mandatory for devices like ziplines in Ontario.
- Scrutinize the medical waiver; it’s a legal document outlining specific risks, and its clarity reflects the operator’s professionalism.
- Assess operational readiness, including real-time weather monitoring and comprehensive safety briefings, as these are hallmarks of a diligent provider.
- Confirm equipment and staff certifications (e.g., UIAA, ACCT) to ensure they meet established Canadian and international safety benchmarks.
The pull of an adrenaline-pumping experience in Ontario is undeniable. Whether it’s the sheer drop of a bungee jump, the rush of a zipline through the forest canopy, or the challenge of whitewater rapids, these activities promise unforgettable moments. Yet, for the cautious thrill-seeker, a nagging question often accompanies the excitement: “Is this truly safe?” You might look for good reviews or choose a company that looks professional, but these are often superficial metrics. Relying on an operator’s marketing promises alone is a gamble, as not all providers adhere to the same rigorous standards.
The core issue isn’t just about avoiding injury; it’s about making an informed decision before you ever hand over your credit card. The anxiety of the unknown can diminish the thrill you seek. But what if you could shift your perspective from that of a hopeful tourist to a discerning inspector? The key to unlocking confident adventure isn’t about finding a “reputable” company; it’s about learning to recognize the objective, verifiable markers of safety and regulatory compliance. It’s about knowing what to look for and what questions to ask.
This guide will equip you with an inspector’s mindset. We will move beyond vague assurances and delve into the concrete standards that govern high-adrenaline activities in Ontario. You will learn how to decode the mandatory TSSA certifications, understand the legal weight of a waiver, evaluate an operator’s readiness for environmental factors like wind, and assess the very real safety distinctions between different types of activities. It’s time to replace uncertainty with a checklist and book your next adventure with the confidence that comes from due diligence.
To help you navigate these critical safety checks, this article is structured to walk you through the key areas of verification. The following table of contents outlines the essential topics we will cover, from regulatory compliance to on-site risk management.
Table of Contents: A Guide to Validating Adrenaline Activity Safety in Ontario
- TSSA Certification: What Does That Sticker Mean on a Zipline?
- How to Lower Your Heart Rate Before the Drop: Breathing Techniques?
- Solo Jump vs. Tandem: Which Is Safer for First-Timers?
- The Medical Waiver: Why Do High Blood Pressure Conditions Disqualify You?
- Morning vs. Afternoon: When Is Wind Shear Lowest for Aerial Activities?
- How to Handle Vertigo on Exposed Ridges Without Freezing Up?
- The Rockfall Hazard: Why Is Helmets Mandatory Even for Belayers?
- Whitewater Canoeing: How to Master the J-Stroke for Class III Rapids?
TSSA Certification: What Does That Sticker Mean on a Zipline?
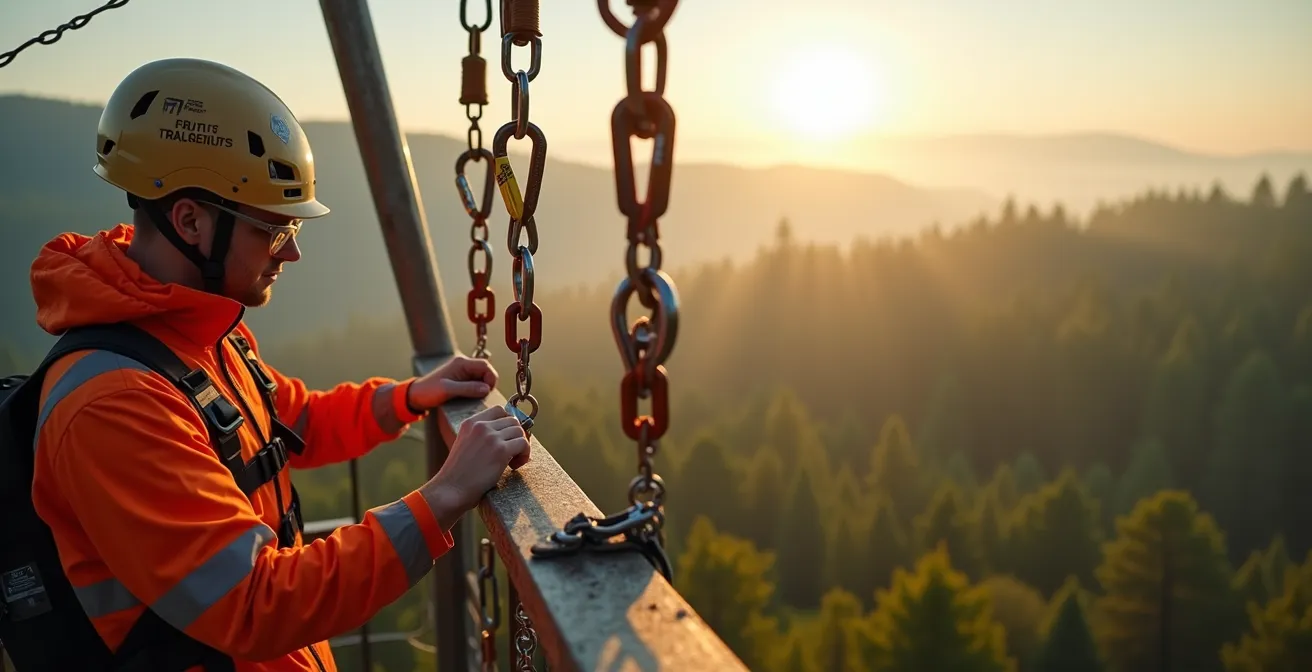
The single most important piece of your safety verification process in Ontario is looking for proof of TSSA compliance. The Technical Standards and Safety Authority (TSSA) is the regulatory body responsible for ensuring the safety of “amusement devices,” a category that includes everything from roller coasters to commercial ziplines. This isn’t an optional best practice; it’s the law. In fact, since 2014, all Ontario ziplines must be registered as Amusement Devices with the TSSA. That sticker you see on a support tower or near the launch platform isn’t just decoration; it’s a public declaration that the device is licensed and subject to provincial safety oversight.
From an inspector’s viewpoint, the absence of a TSSA permit sticker is an immediate red flag. It suggests the operator may be bypassing mandatory inspections, insurance requirements, and engineering reviews. The certification process is rigorous, covering design, construction, maintenance, and operator training. It ensures that the equipment, like the cable and harness systems, is built to withstand specified forces and that the operation has documented safety procedures. This TSSA oversight provides a baseline of safety that you, as a consumer, can and should rely on.
To properly verify compliance, you need to know what you’re looking for. The image below shows the kind of technical detail that inspectors scrutinize, focusing on wear patterns, material integrity, and the functionality of redundant safety mechanisms. It is this level of detail that TSSA certification helps to standardize and enforce.

While you won’t be performing a micro-inspection, you can perform a high-level check. A legitimate operator will be transparent about their TSSA license and other certifications. They understand that jejich professionalism is a selling point for discerning customers. Use the following checklist to guide your verification process before booking.
Action Plan: How to Verify a Zipline Operator’s TSSA Status
- Locate the Permit Sticker: Look for the TSSA permit sticker prominently displayed on the zipline structure itself. Each device, like an individual zipline, requires its own permit.
- Request the License Number: Ask the operator directly for their TSSA license number, which is required for operating an amusement business in Ontario.
- Check Equipment Standards: Inquire if their equipment (harnesses, helmets, carabiners) is certified to recognized standards such as UIAA, CE, NFPA, ULC, CSA, or ASTM.
- Observe Supervision Ratios: Ask about staff-to-guest ratios and confirm they align with TSSA-stipulated guiding requirements for the specific activity.
- Ask About Third-Party Inspections: Check if the facility undergoes periodic inspections from an ACCT (Association for Challenge Course Technology) certified inspector, which is a common industry best practice.
How to Lower Your Heart Rate Before the Drop: Breathing Techniques?
While regulatory compliance provides external safety, managing your internal state—your own heart rate and anxiety—is crucial to safely enjoying the experience. The moments before the “drop” are often a mix of excitement and fear. Mastering a simple breathing technique can make a significant difference. The most effective method is box breathing: inhale slowly for a count of four, hold your breath for four, exhale slowly for four, and hold the empty breath for four. This physiological trick helps regulate your autonomic nervous system, moving you from a “fight or flight” response to a more calm and controlled state.
However, an inspector’s mindset recognizes that your personal calm is also influenced by the operator’s professionalism. A high-quality operator contributes actively to your peace of mind. For example, the professional staff and thorough safety measures at experiences like the CN Tower EdgeWalk are designed to help participants focus less on fear. A calm, methodical, and comprehensive safety briefing is a hallmark of a good operator. If the staff seem rushed, disorganized, or dismissive of questions, it’s a significant red flag. Their ability to manage your group’s anxiety is as much a part of the safety system as the ropes and harnesses.
The Government of Canada echoes this sentiment, emphasizing the importance of choosing a guide and company wisely. As their official travel advice states, you should never undertake these activities without proper support. The guidance is clear:
Don’t do it alone. Bring enough water. When hiring a guide, make sure they are experienced and from a reputable company. Some tour operators may not meet Canadian safety standards.
– Government of Canada, Travel.gc.ca Adventure Travel Safety Guidelines
This official warning underscores the need for your own due diligence. Your ability to stay calm is directly linked to the trust you can place in the operation. If the briefing doesn’t inspire confidence, it’s a sign that the operational safety culture may be lacking.
Solo Jump vs. Tandem: Which Is Safer for First-Timers?
When faced with the choice between a solo or tandem experience, a first-timer’s decision should be based on a clear-eyed assessment of risk and responsibility, not just on bravado. From a safety inspector’s perspective, the answer is unequivocal for a novice: a tandem jump is inherently safer. The reason lies in the distribution of cognitive load and decision-making. In a tandem setup, you are a passenger. Your role is passive, and you are attached to an experienced, certified instructor who manages all the complex systems, procedures, and emergency responses.
A solo jump, by contrast, places the full weight of responsibility on you. It requires extensive ground training to handle equipment, navigate procedures, and make critical decisions under extreme stress. The potential for user error is exponentially higher. This is why international safety standards like ISO 21101 exist, setting minimum requirements for operators to ensure they have protocols for different participation models. These standards recognize that the level of participant autonomy directly impacts the risk profile of the activity.
An operator’s approach to this choice is revealing. A safety-conscious company will strongly recommend or even mandate a tandem experience for all first-timers. They understand that managing a novice’s fear and ensuring a positive outcome is their primary responsibility. The following table breaks down the key differences from a safety and liability standpoint.
| Factor | Solo Jump | Tandem Jump |
|---|---|---|
| Training Required | Extensive ground school | Brief safety orientation |
| Decision Making | Participant responsibility | Instructor controlled |
| Equipment Complexity | Must manage own gear | Instructor manages systems |
| Cognitive Load | High – multiple tasks | Low – passive experience |
| Insurance Requirements | Higher liability coverage | Standard operator coverage |
Ultimately, choosing tandem isn’t a sign of weakness; it’s a sign of smart risk management. It allows you to experience the full thrill of the activity while leaving the complex safety procedures in the hands of a trained professional, dramatically reducing the potential for critical error.
The Medical Waiver: Why Do High Blood Pressure Conditions Disqualify You?
The medical waiver you’re asked to sign is far more than a simple formality; it’s a critical legal and safety document. Conditions like high blood pressure, heart problems, or certain neurological disorders are often listed as disqualifiers for a crucial reason: the intense physiological stress of an adrenaline activity can be dangerous. A sudden spike in blood pressure during a bungee jump, for example, could pose a severe health risk to someone with a pre-existing cardiovascular condition. By asking you to declare these conditions, the operator is performing a vital step in their duty of care.
In Ontario, this process is governed by the Occupiers’ Liability Act, which legally obligates adventure tourism operators to maintain safe premises and take reasonable steps to protect participants. A key part of this is disclosing all foreseeable risks. According to legal experts in adventure tourism insurance, Ontario courts often uphold waivers if the risks are clearly explained, the document is signed voluntarily and in advance, and the language is plain and specific to the activity. An operator who uses a vague, one-size-fits-all waiver is demonstrating a lack of diligence. A detailed, activity-specific waiver that clearly lists medical contraindications shows that the operator has thoroughly considered the risks and is serious about participant safety.
Therefore, when you review the waiver, don’t just sign it blindly. Read it as an inspector would. Does it clearly outline the specific physical and psychological demands of the activity? Does it list specific medical conditions that could increase your risk? Full and honest disclosure on your part is non-negotiable. Hiding a condition to participate puts not only you at risk, but also the staff and other participants. A refusal to allow you to participate based on a declared medical condition isn’t a disappointment; it’s a sign that the operator’s safety protocol is working exactly as it should.
Morning vs. Afternoon: When Is Wind Shear Lowest for Aerial Activities?
For any aerial activity like ziplining or bungee jumping, weather is not a minor detail—it’s a core component of the safety system. Wind, in particular, is a critical variable. From an inspector’s standpoint, the best time for these activities is almost always the early morning. This is because the ground has cooled overnight, leading to more stable atmospheric conditions. As the sun heats the ground during the day, it creates thermal updrafts, which can lead to unpredictable gusts and wind shear, especially in valleys or near large cliffs.
A professional operator doesn’t guess about the weather; they measure it. They will have on-site anemometers (wind speed meters) and clear, conservative operational limits. For instance, TSSA-compliant active zip line brake systems have strict speed parameters, and TSSA regulations specify an upper speed limit for these systems that high winds can compromise. A competent operator will suspend operations well before conditions approach these legal or manufacturer-specified limits. When booking, always ask: “What is your maximum wind speed for operation, and how do you monitor it?” A confident, specific answer is a sign of a diligent operation.

As the image above illustrates, calm morning air, often accompanied by valley mist, provides the most predictable and safe environment for aerial adventures. Your checklist for weather assessment should include:
- Checking public forecasts, specifically Environment Canada’s aviation weather reports (METAR/TAF), which provide detailed wind data.
- Booking early morning sessions to avoid the typical afternoon thermal turbulence and potential for thunderstorms.
- Confirming the facility uses on-site anemometers for real-time wind monitoring, rather than just relying on regional forecasts.
- Asking the operator directly about their wind speed limits and their protocol for suspending operations.
A professional operator will welcome these questions. They see the weather not as an inconvenience, but as a manageable risk that demands constant respect and vigilance.
How to Handle Vertigo on Exposed Ridges Without Freezing Up?
Vertigo, or a debilitating fear of heights, can turn a thrilling adventure into a terrifying ordeal. On an exposed ridge or a suspension bridge, like the 600-foot-long one at Eagle Canyon Adventures near Thunder Bay, freezing up is a real possibility. The key to managing vertigo is a combination of mental preparation and physical technique. First, control your gaze. Instead of looking straight down into the void, focus on a fixed point a few feet in front of you on the path or on the horizon. This helps your brain establish a stable reference point.
Second, manage your breathing. As discussed earlier, slow, deliberate box breathing can calm your nervous system. Finally, maintain three points of contact whenever possible if you feel unsteady—two feet and one hand on a railing, for example. Move slowly and deliberately. This is not a race. The goal is to stay in control of your own body and mind. If you are with a guide, communicate your feelings clearly. A good guide is trained to provide verbal support and physical assistance if needed.
This self-management fits into a broader safety philosophy advocated by experts like Parks Canada. Their advice for all outdoor trips is to follow the “Three T’s,” a simple yet profound framework for personal preparedness.
For all trips follow the Three T’s: Trip plan, Training to learn knowledge and skills before heading out, and stay within your limits
– Parks Canada, Parks Canada Mountain Safety Guidelines
Handling vertigo is a perfect example of this principle. The “Training” is practicing focus and breathing techniques. “Staying within your limits” means being honest with yourself about your fear of heights and choosing activities accordingly. Starting with a lower, shorter bridge before tackling a 150-foot-high canyon crossing is a smart, progressive approach to expanding your comfort zone safely.
The Rockfall Hazard: Why Is Helmets Mandatory Even for Belayers?
In activities like rock climbing, the focus is often on the person scaling the cliff face. However, from a safety inspector’s viewpoint, the person on the ground—the belayer—is exposed to significant risk as well. The mandatory helmet rule for everyone at a climb site, including belayers and bystanders, is rooted in a fundamental principle of risk management: protecting against objective hazards. A rockfall, whether naturally occurring or dislodged by a climber above, is an objective hazard. It doesn’t discriminate. A belayer, whose attention is focused upwards on the climber, is in a particularly vulnerable position.
The helmet is a non-negotiable piece of personal protective equipment (PPE). Reputable operators in climbing-rich areas like Rattlesnake Point Conservation Area will strictly enforce this rule. This enforcement is a clear indicator of a strong safety culture. They understand that safety is a system, not a suggestion. The integrity of this system depends on every component, including the belayer’s protection. When choosing a climbing outfitter, observe their gear-up process. Do they check that every helmet is fitted correctly? Do they explain *why* it’s mandatory for everyone, not just the climber?
Furthermore, all equipment used must adhere to strict manufacturing standards. According to Ontario safety guidelines for educational and recreational climbing, all climbing gear must meet standards set by bodies like the UIAA (International Climbing and Mountaineering Federation) or CE (Conformité Européenne). These certifications ensure the helmet can withstand specific impact forces and the ropes can handle fall loads. An operator should be able to show you these certification marks on their gear. A helmet isn’t just a plastic hat; it’s a piece of engineered safety equipment, and its use should be universal at any site with overhead hazards.
Key takeaways
- Regulatory Compliance is Non-Negotiable: The primary check for any thrill-seeking device in Ontario is its TSSA certification. An absent or expired permit is a definitive reason to walk away.
- Safety is a Shared Responsibility: The medical waiver is a legal document outlining your risks and the operator’s duty of care. Your honest disclosure and their detailed documentation are both essential for a safe experience.
- Operational Excellence is in the Details: A truly safe operator demonstrates their competence not just in their gear, but in their procedures—from rigorous weather monitoring to calm, comprehensive safety briefings.
Whitewater Canoeing: How to Master the J-Stroke for Class III Rapids?
Venturing into Class III rapids on a river like the mighty Ottawa requires more than just courage; it demands proven technical skill. While mastering a corrective stroke like the J-stroke is fundamental, the real safety question for a novice is not “how do I do it?” but “how do I verify that my guide is qualified to teach and lead me in this environment?” From an inspector’s perspective, a guide’s competence is the most critical safety system on the water.
A qualified whitewater guide or instructor will have a clear, progressive training methodology. They will never throw a beginner into challenging conditions. Instead, their approach will look something like this:
- Starting on calm water (a lake or a Class I section) to build muscle memory for the basic strokes without the pressure of a current.
- Progressing to moving water (Class I-II) to practice ferry gliding, eddy turns, and peel-outs, using the J-stroke for precise boat control.
- Introducing more complex maneuvers and rescue techniques in a controlled environment.
- Only attempting Class III rapids after a participant has demonstrated consistent and efficient technique, as well as an understanding of river dynamics.
When vetting a canoe outfitter, ask about their guide’s certifications (e.g., from Paddle Canada) and their specific instructional plan for novices. A vague answer is a red flag. A detailed, progressive plan is a sign of a professional, safety-oriented operation.
The goal is to experience the incredible thrill of locations like the Ottawa River, known for some of the best whitewater in the world, but to do so under the guidance of someone whose expertise is verifiable. A great guide builds your skills systematically, ensuring that by the time you face a challenge, you are prepared for it.
By adopting this inspector’s mindset—verifying certifications, scrutinizing procedures, and assessing competence—you transform yourself from a passive passenger into an active, informed participant. Don’t let uncertainty hold you back from the incredible adrenaline experiences Ontario has to offer. Apply these verification principles to your next adventure and book with the confidence you deserve.